Ever wanted to translate a string of text outside Safari on your Mac? Read along how to translate any selectable text on your Mac running macOS Monterey.
When Apple launched macOS 11 Big Sur last year, it introduced a new translation feature that can convert webpages in Safari into different languages. While it’s a neat feature that helps Safari better compete with rival browsers like Chrome and Firefox, it’s limited to Safari itself.
Thankfully, with the recently announced macOS Monterey and iOS 15, Apple also introduced a system-wide translation feature that holds the capability to translate any text you can select, even outside of Safari.
Why is system-wide translation useful
Using a Mac, or for that matter, an iPhone, involves much more than simply browsing websites through Safari. There are a lot of different ways Mac and iPhone users interact with text on their devices.
This includes sending messages, taking notes, drafting emails, writing diaries, and more; meaning you might need translation tools at your quick disposal. And so far, you could already copy or paste a string of text into your favorite translation app or even Apple’s Translation app (on the iPhone). But it’s indisputably a tedious process.
System-wide translation fixes that, thanks to Apple’s new implementation.
How does system-wide translation work on a Mac
First off, system-wide translation is only available on Macs capable of running macOS Monterey. So, if you use a Mac that falls out of Apple’s compatibility list for the update, you won’t be able to use the feature.
That said, Apple uses its own translation system for translating system-wide text on a Mac. It seems like an extension of the Translation app on iOS what with its similar design language. That said, any precision you’d expect while translating a string or a chunk of text is directly dependent on how capable Apple’s translation service is.
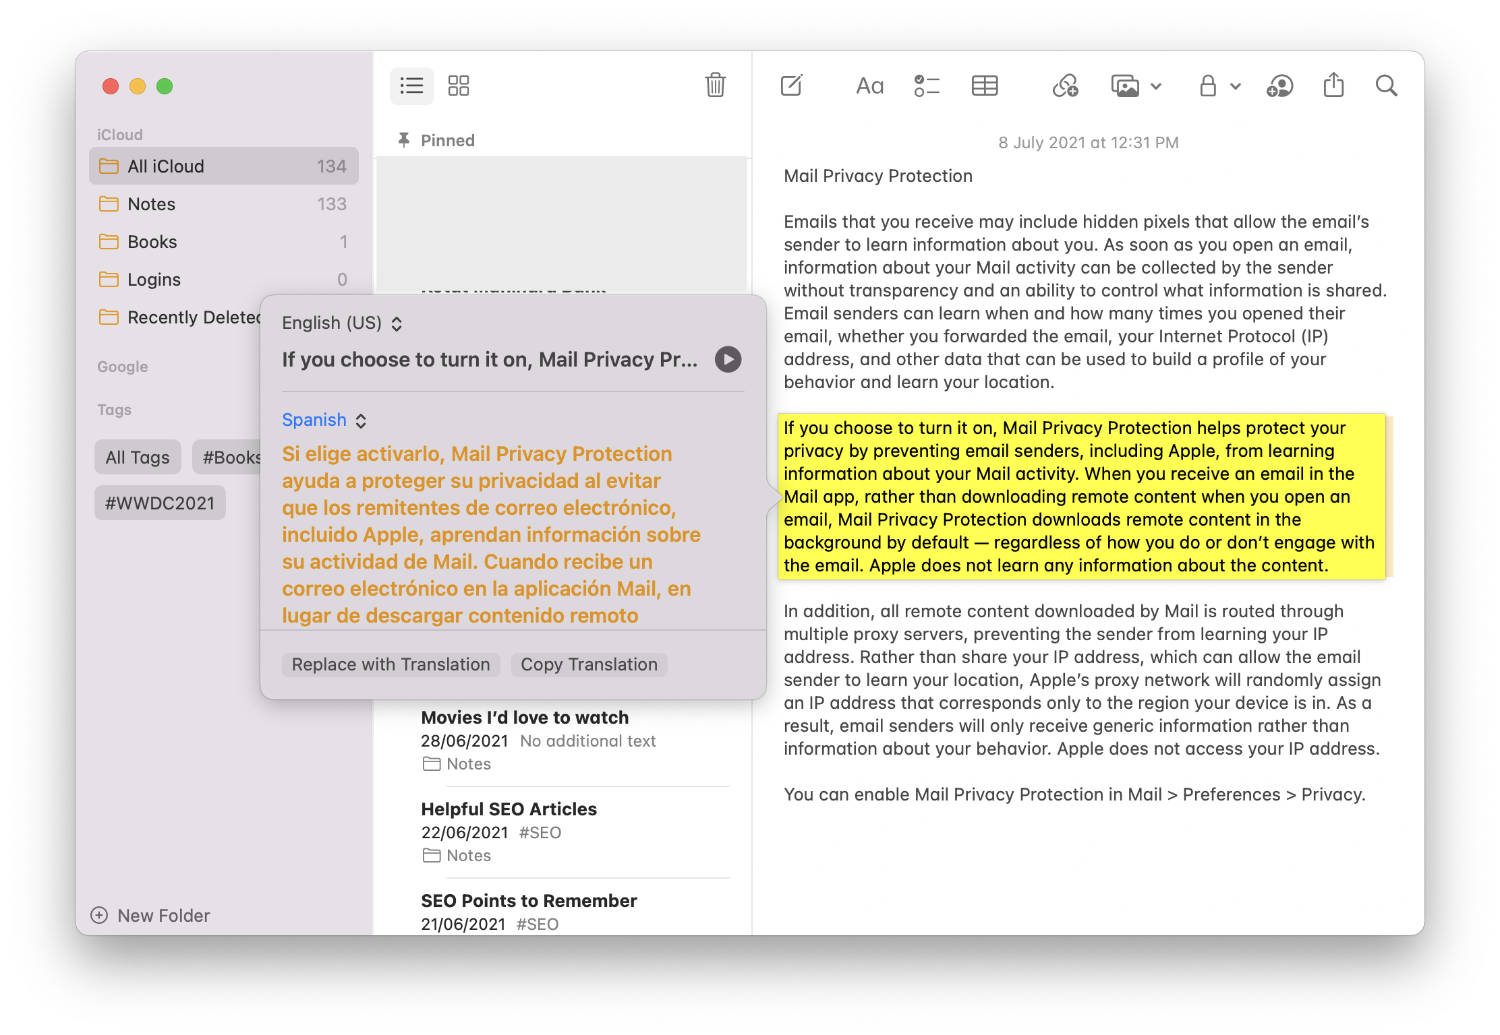
It’s not honed to the level of Google Translate but it does the job in most instances. You can manage languages from the Language preferences and also enable on-device translation which Apple says is less accurate than online translation.
That said, it works on text anywhere including text selected using Apple’s new Live Text feature.
How to translate any text on your Mac using Apple’s system-wide translation tool
- Select a string or a chunk of text anywhere on your Mac.
- Right-click on the text.
- Among the options that appear, select “Translate…”
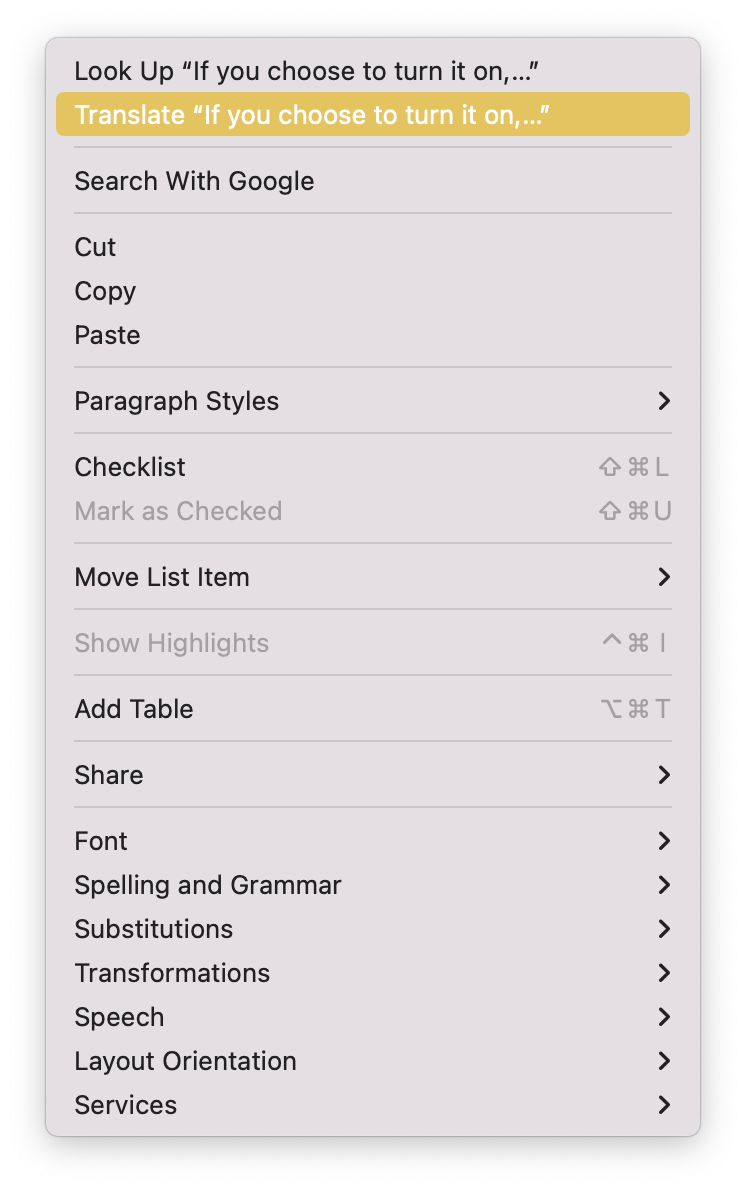
- A popup will appear with the translated text.

How to change the language of translation
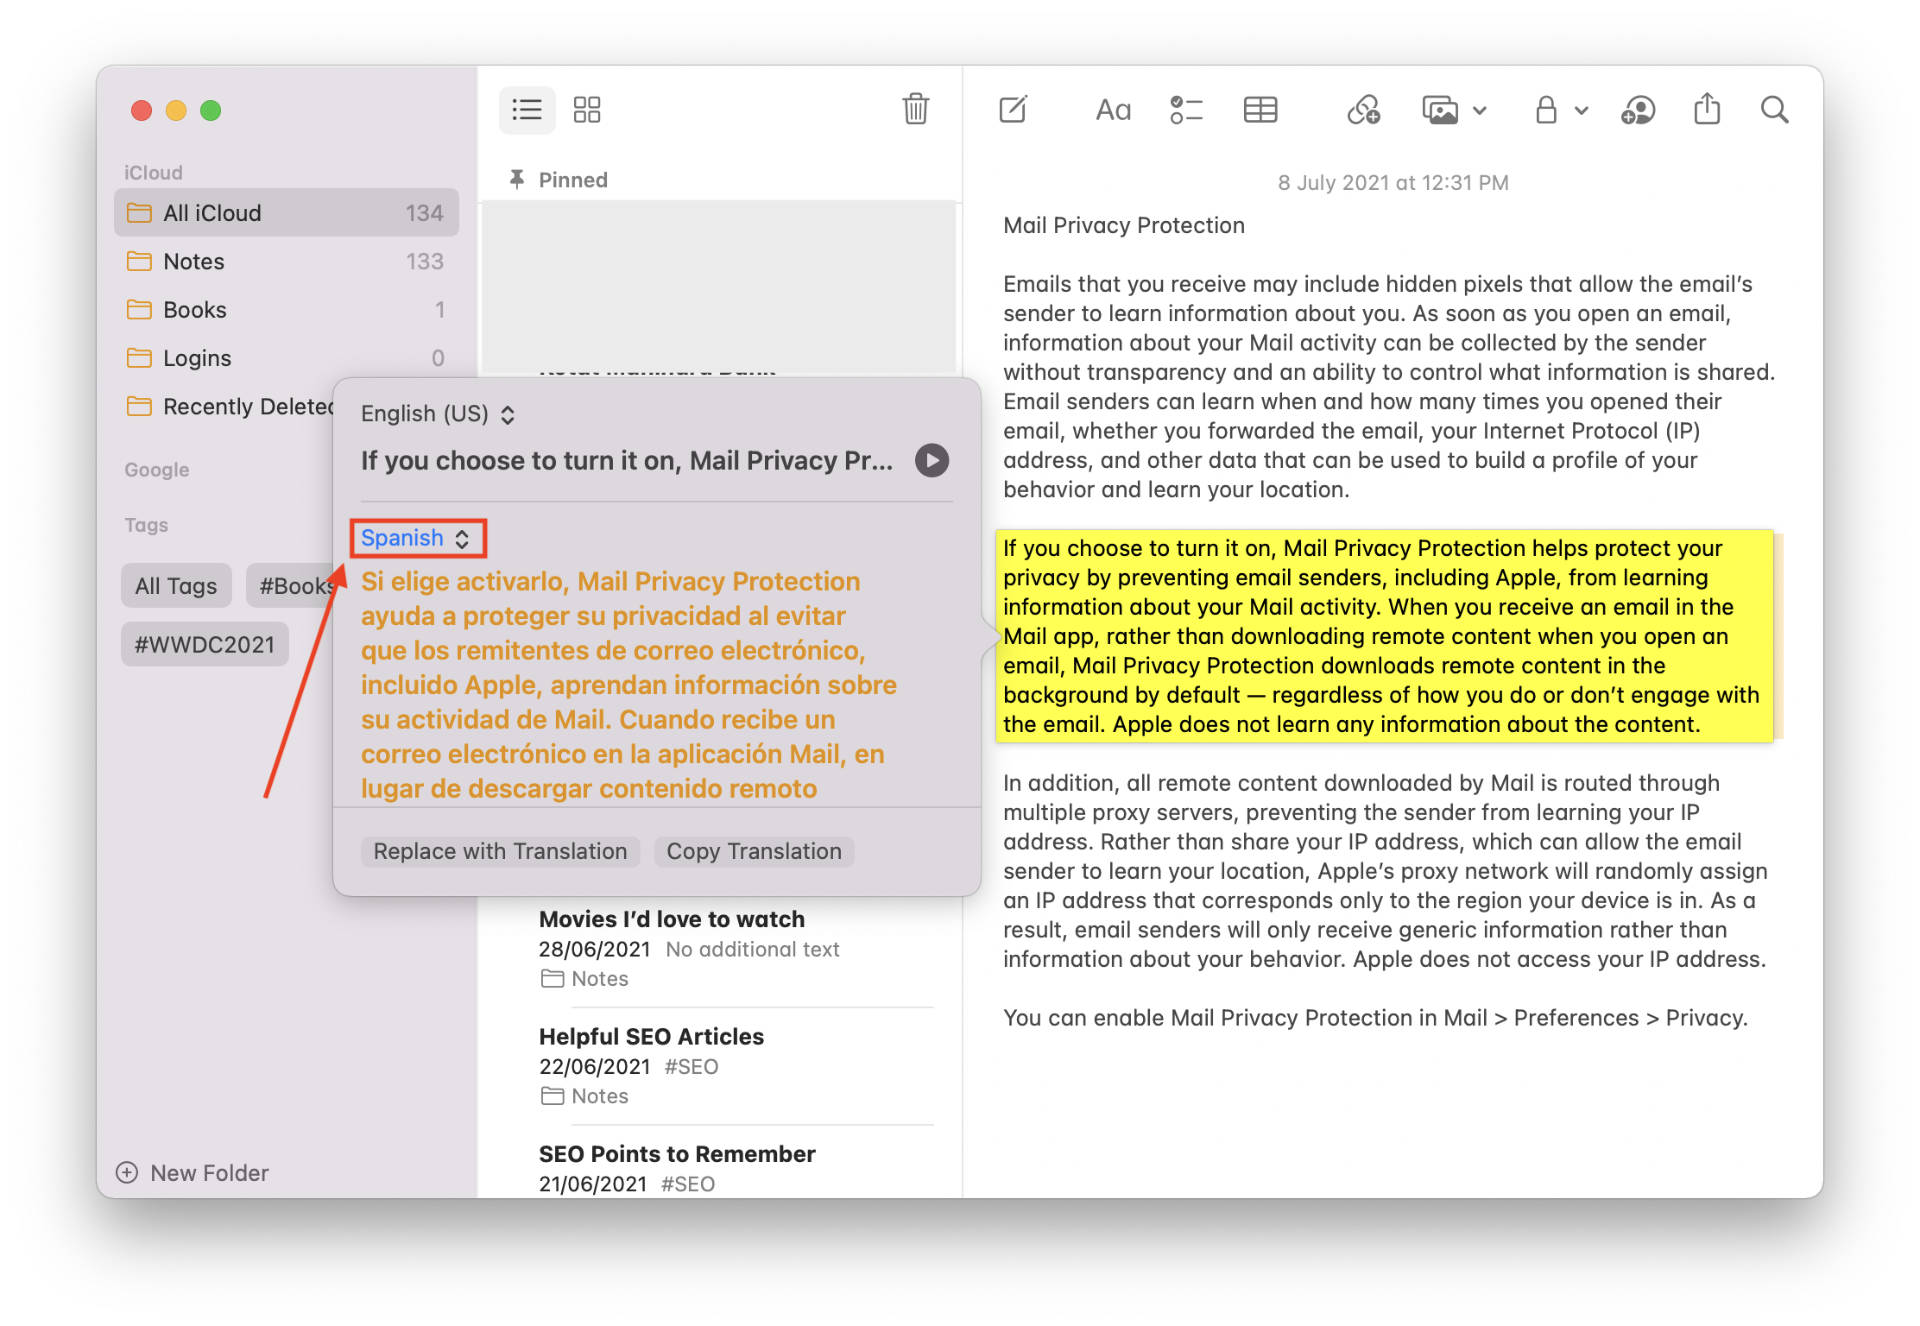
- On the translation popup, click on the translation language.
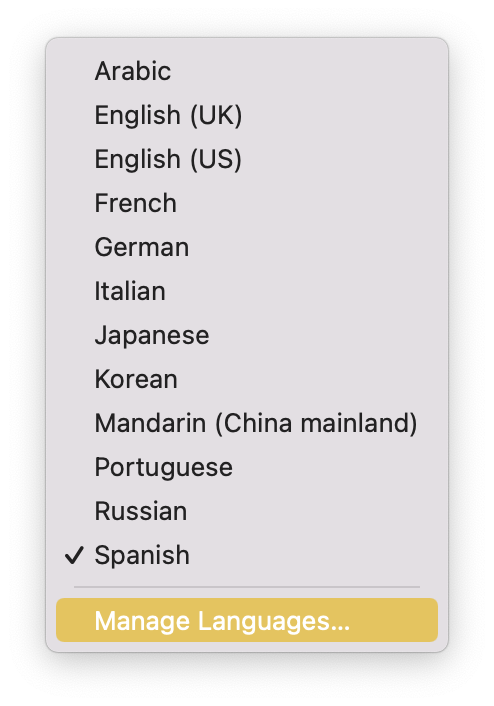
- From the list of languages that appear, choose the language you want the text you selected to be translated to.
How to replace the selected text with translated text
Interestingly, you can also replace the selected text with the translated text in places where it’s possible, making it easier to make changes to a document or a note.
- Select a string or a chunk of text anywhere on your Mac.
- Right-click on the text.
- Among the options that appear, select “Translate…”

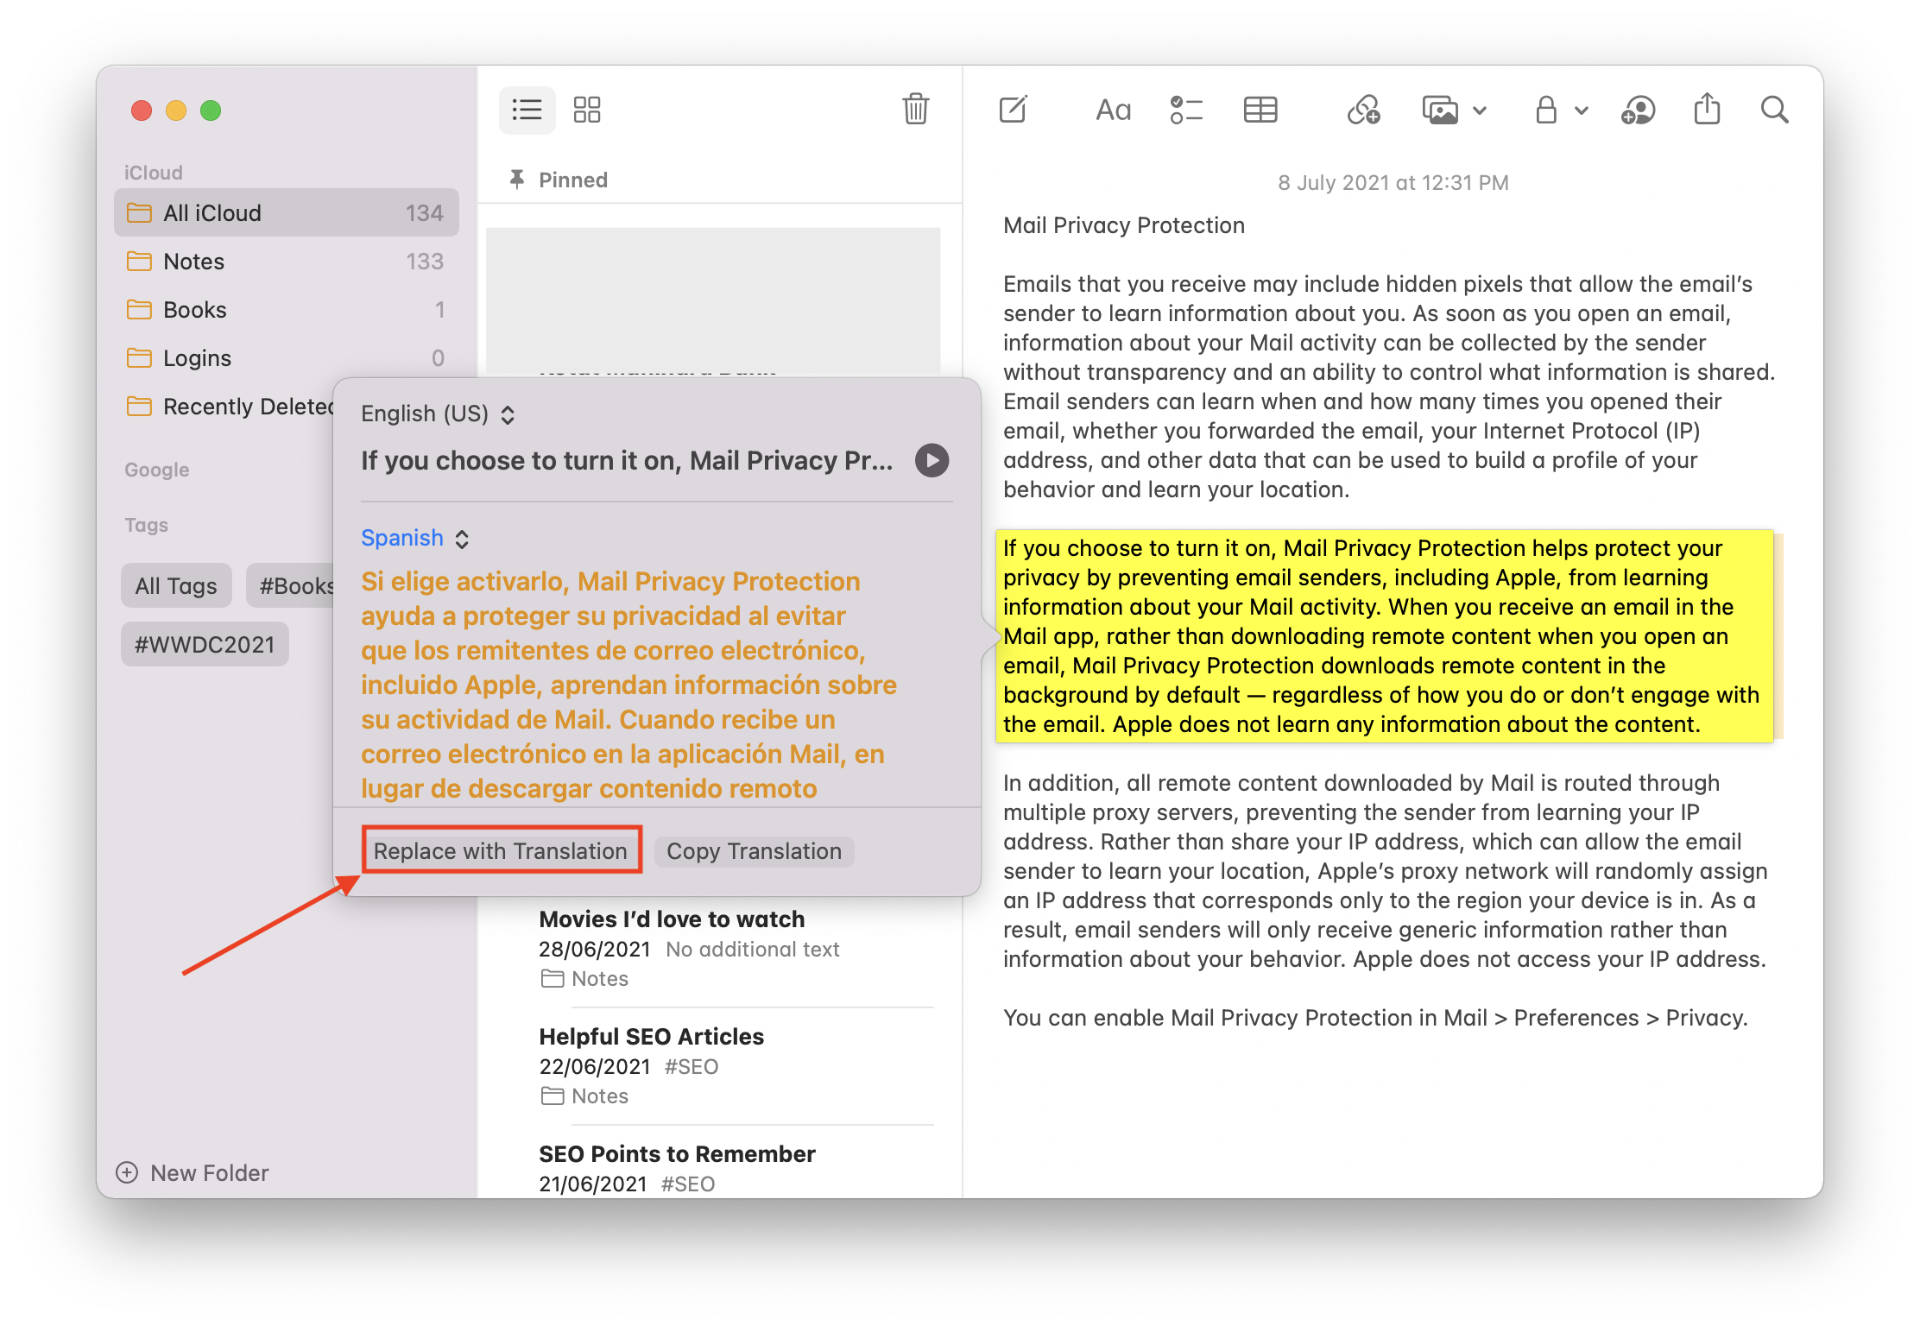
- A popup will appear with the translated text. There, click on “Replace with Translation.”
How to enable on-device translation mode on macOS Monterey
On-device translation mode lets you instantly translate text using downloaded language packs. Apple warns that offline translations, although faster, might not be as accurate as online translations. Moreover, Siri and Safari “will always process translations online.”
That said, here’s how you can enable on-device translation on macOS Monterey.
- Head over to the macOS System Preferences by clicking on the Apple logo in the Menu Bar.

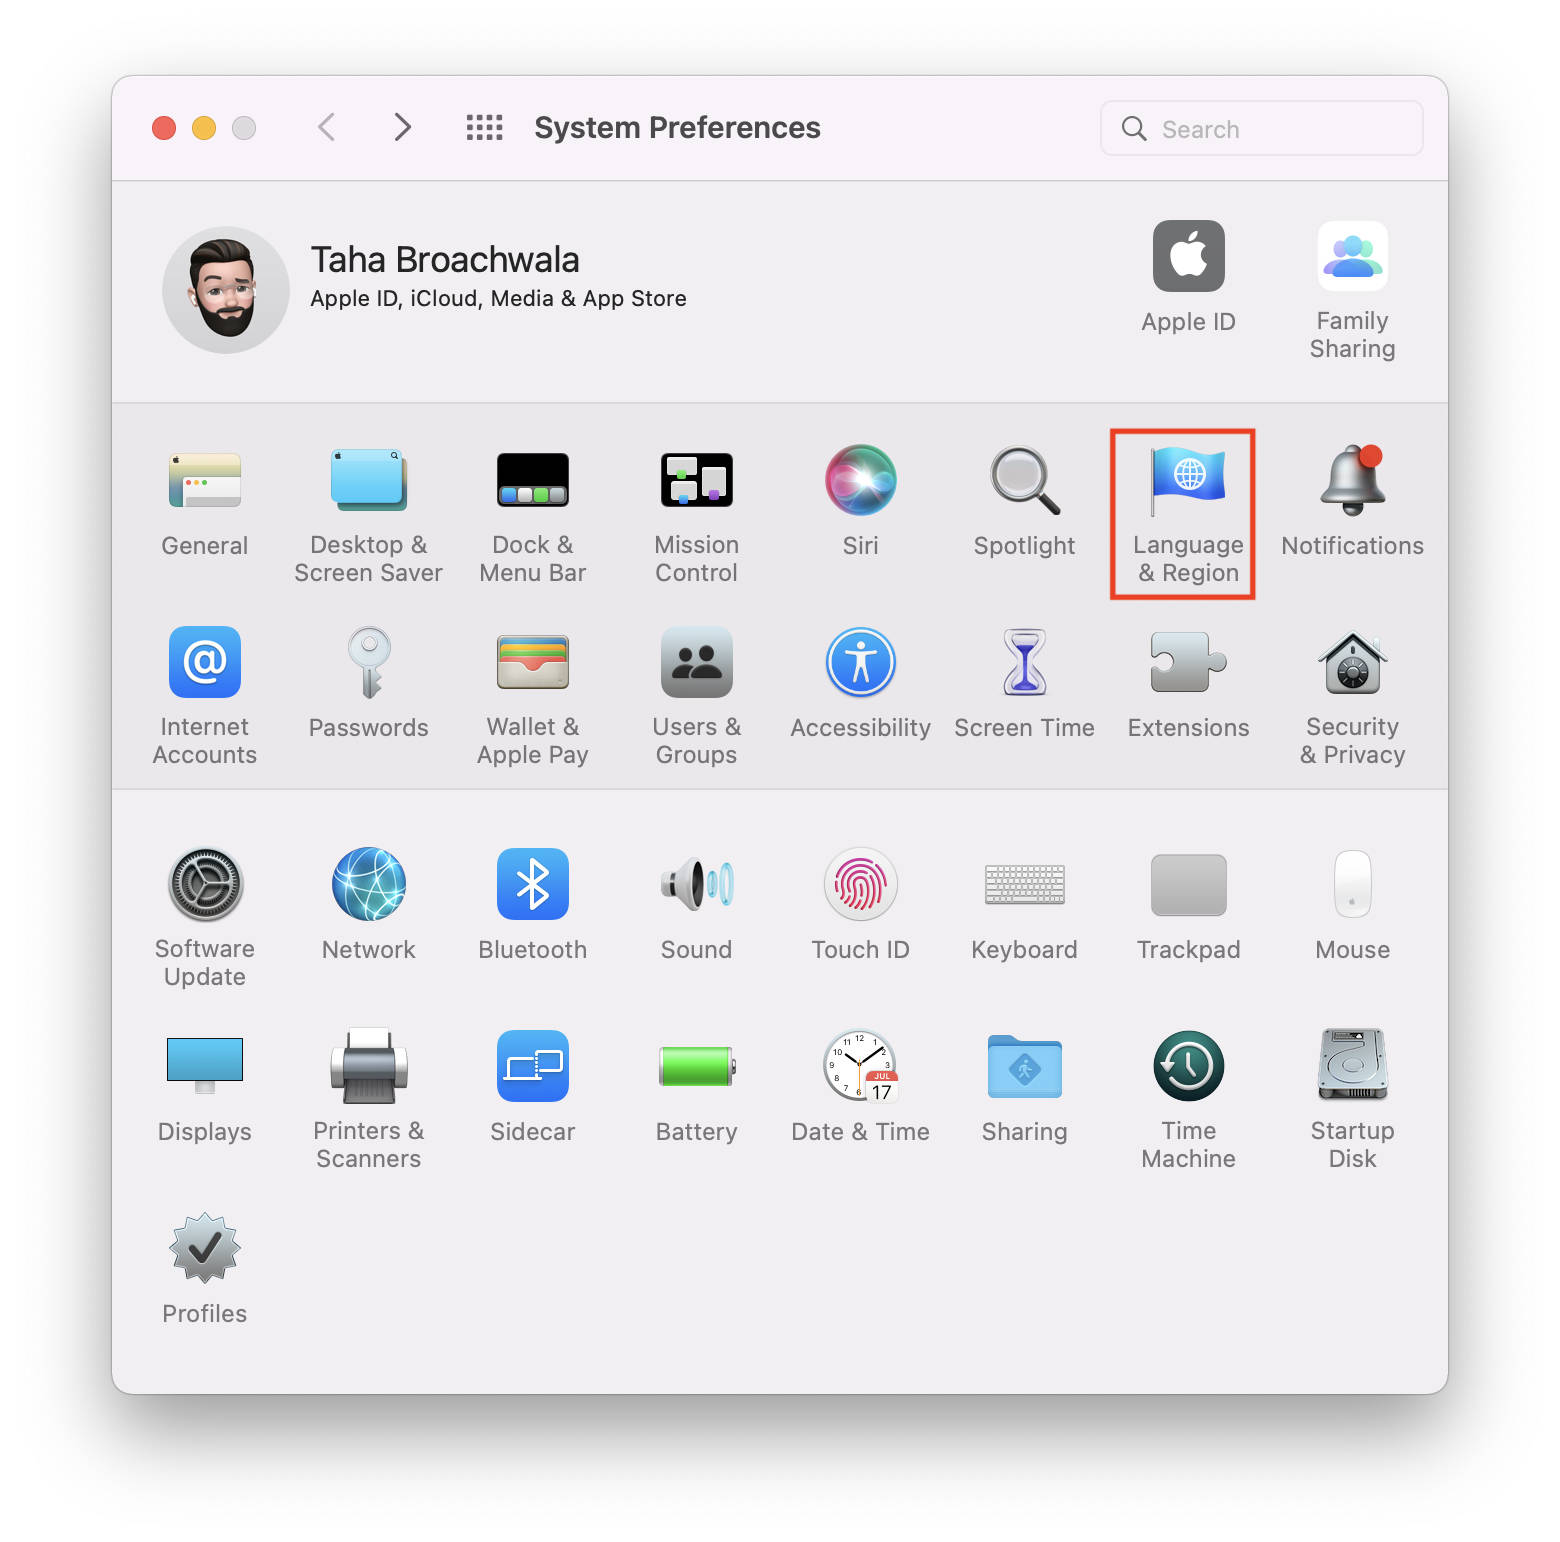
- Click on Language & Region.
- Click on the Translation Languages button in the bottom-right corner of the window.

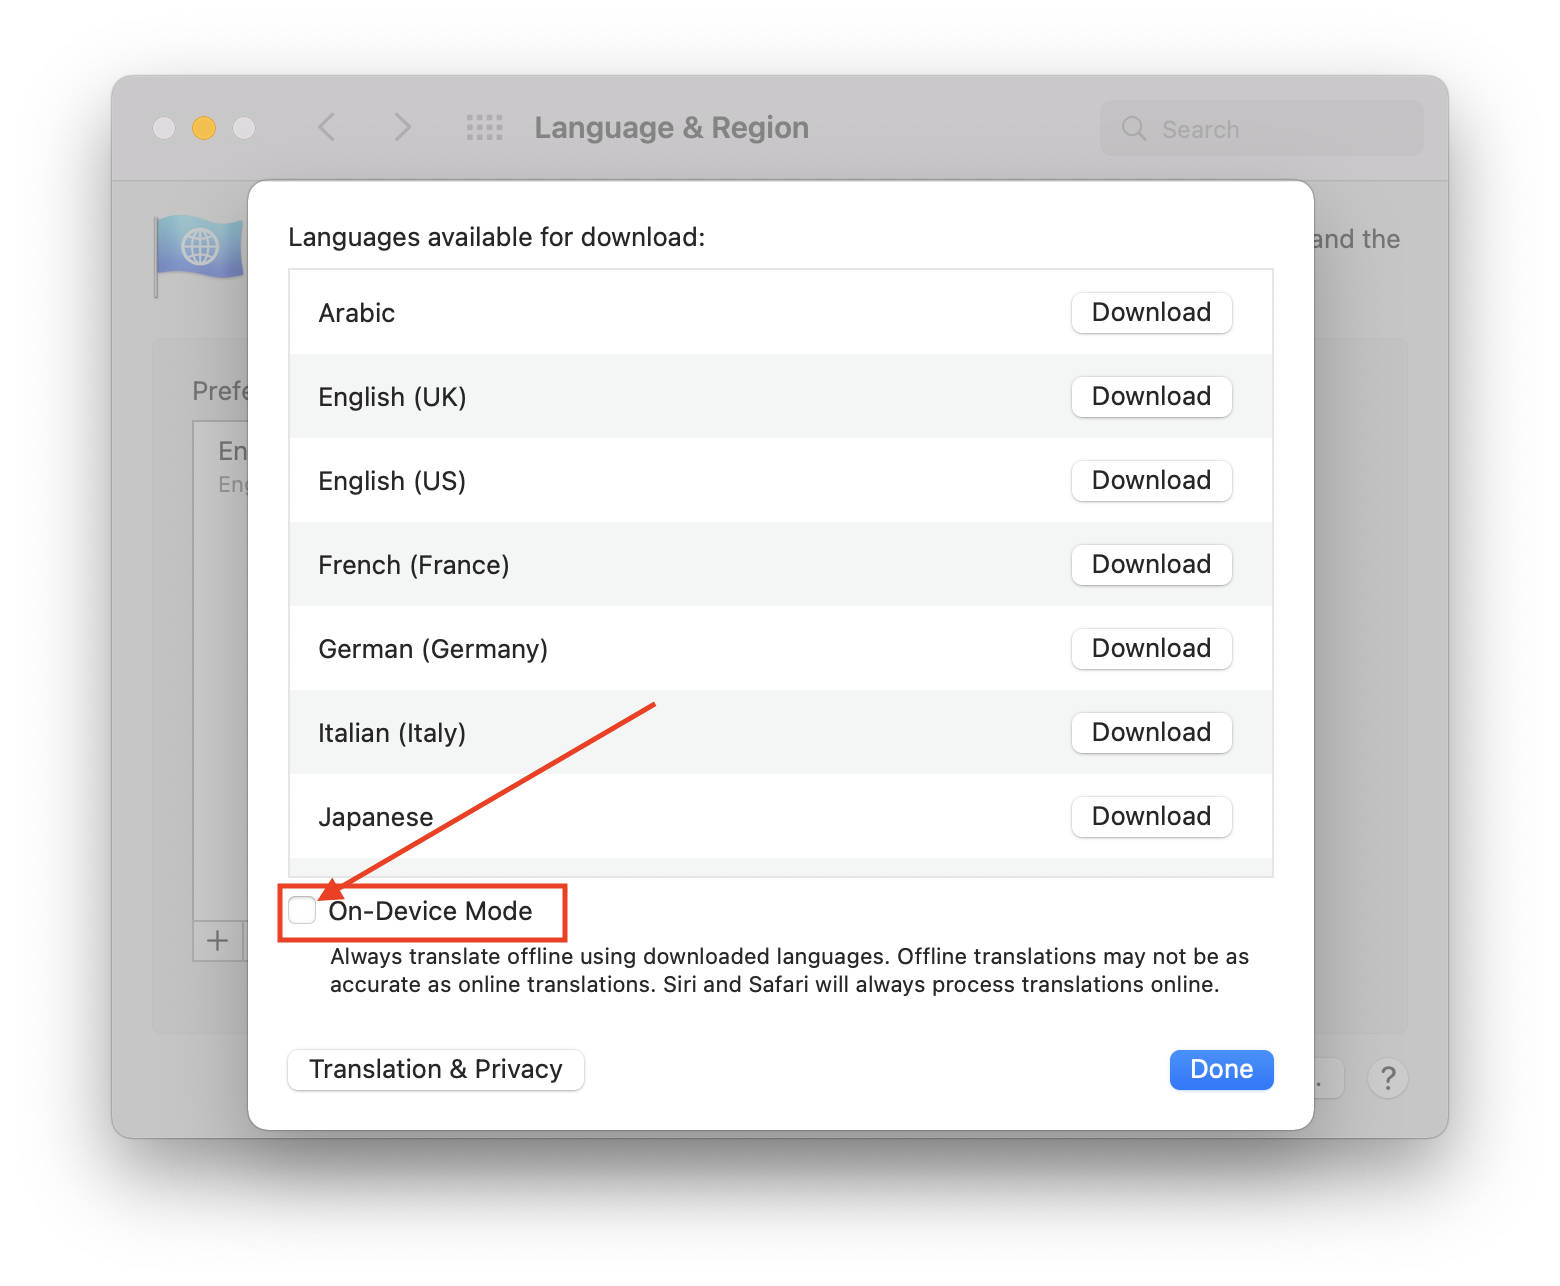
- Tick the checkbox accompanied by the On-Device Mode label. Make sure it appears blue with a tick.
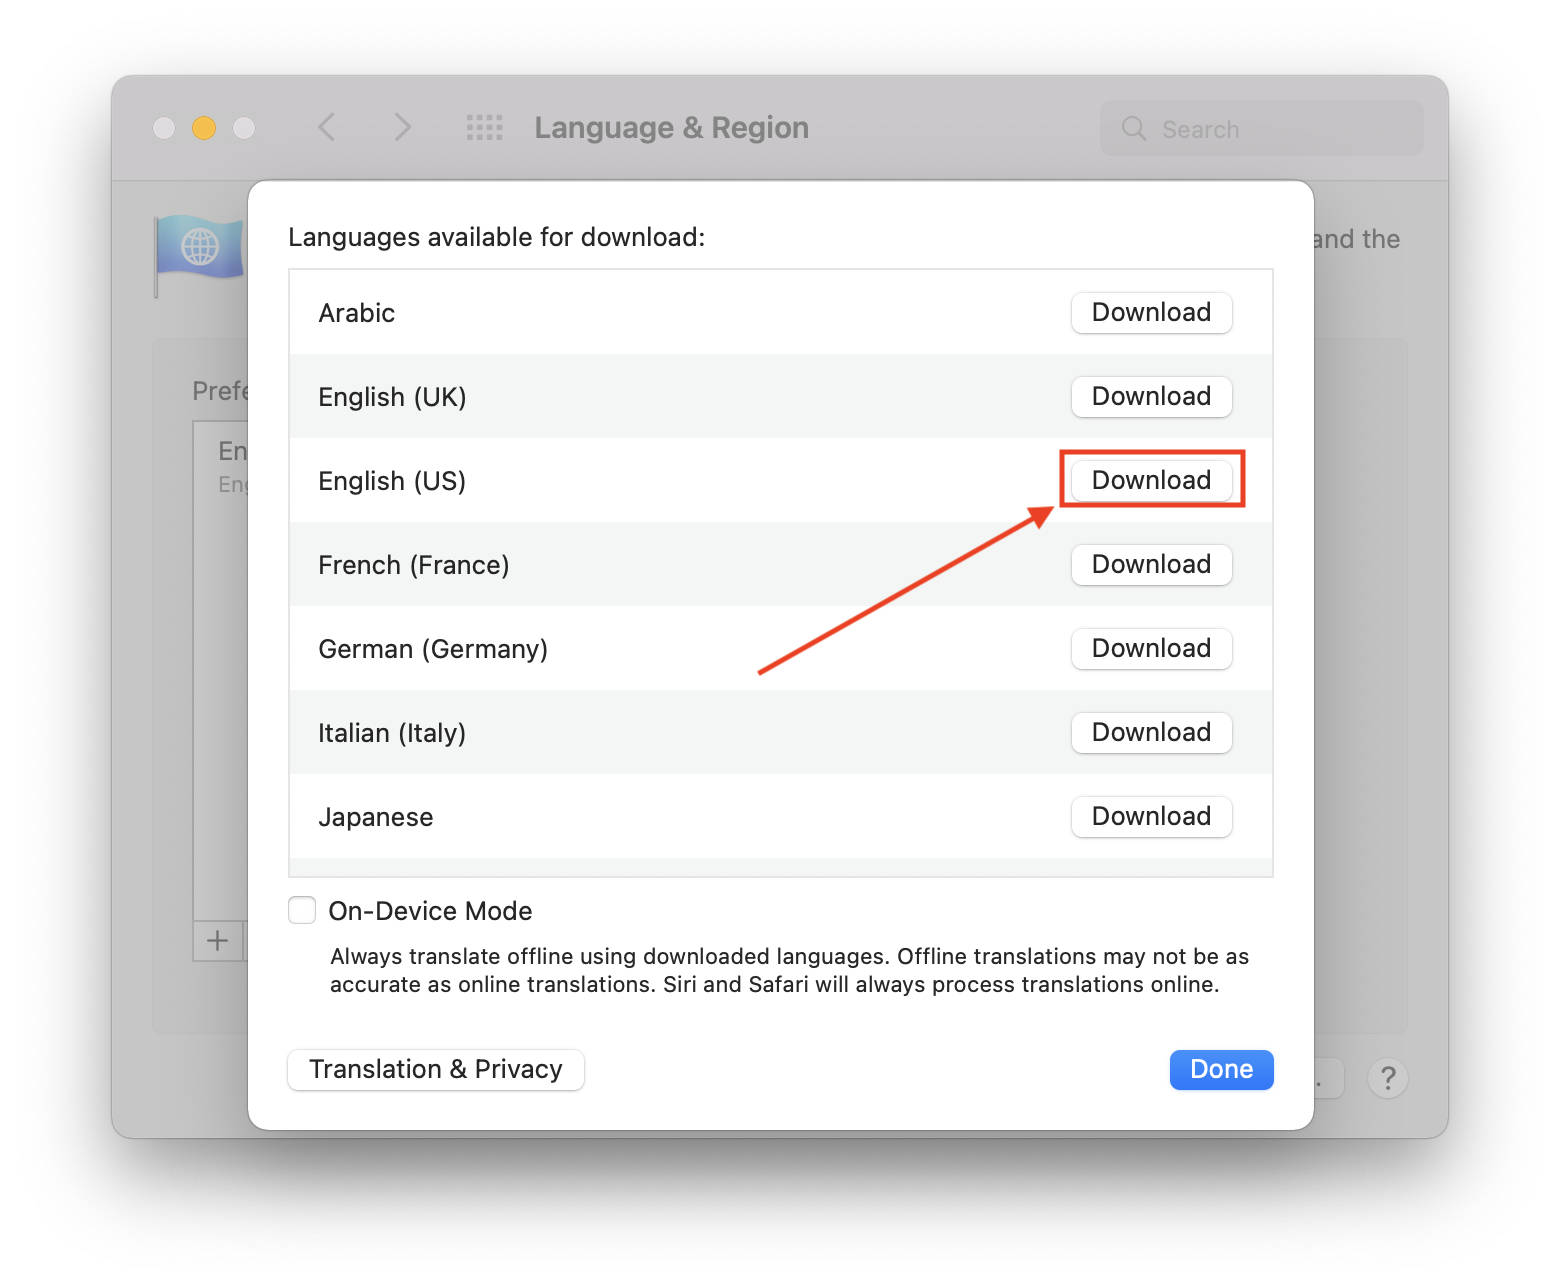
- After you’ve enabled On-Device Mode, finally, click on the Download button on the languages you might want to frequently use for translation. This is necessary for On-Device Mode to work so make sure you don’t skip this step.
Other macOS Monterey Guides you should check out:
- 100+ Fascinating Mac tips and tricks you need to check out!
- How to permanently show Menu Bar in full-screen mode on Mac
- How to share saved passwords on Mac running macOS 12 Monterey
- How to customize the mouse pointer in macOS 12 Monterey
- How to use Tab Groups in Safari in macOS 12 Monterey
- How to use Quick Note in macOS 12 Monterey
- How to AirPlay to Mac from an iPhone/iPad, mirror screen, and stream content
- How to mute notifications temporarily on macOS Monterey and iOS 15
- How to hide your IP Address in Safari on macOS Monterey and iOS 15
- How to enable and customize Focus filters on macOS Monterey
- How to turn on Auto-reply for Focus on macOS Monterey and iOS 15
- How to turn off ‘Shared With You’ in macOS Monterey and iOS 15
- How to add and manage Tags in Notes in macOS Monterey and iOS 15
- How to use Live Text on Mac running macOS Monterey
- How to use Hide My Email to combat spam and secure your email on Mac
- How to use Private Relay on macOS Monterey
- How to add VoiceOver Image Descriptions in the Preview app in macOS Monterey
- How to Enable Low Power Mode on your Mac and How it Works!
- How to enable Mail Privacy Protection on macOS Monterey and iOS 15
- How to change Playback Speed of Voice Memos in macOS Monterey
- How to add animated Memoji on your Mac’s login screen
- How to create Smart Lists in Reminders on macOS Monterey
- How to disable Universal Control on macOS Monterey
- How to ‘Skip Silence’ in Voice Memos on macOS Monterey
- 50+ Coolest Siri Shortcuts for your Mac running macOS Monterey

