Apple recently introduced a couple of interesting updates to the Notes app across its operating systems. These include improved collaboration tools and the ability to add tags to your notes.
In this post, we will focus on how to add and manage tags to the Notes app in macOS Monterey and iOS 15.
But before we do, let’s consider why tags are effective to the degree that most note-taking apps are adopting it.
- What are tags and why are they useful in note-taking?
- How to add tags in macOS Monterey and iOS 15
- How to find notes using tags in the Notes app on macOS Monterey and iOS 15
- How to delete tags in the Notes app on macOS Monterey and iOS 15
- How to create a Smart Folder using tags
- Final Thoughts
- Other macOS Monterey Guides you should check out:
What are tags and why are they useful in note-taking?
Tags in note-taking are simply strings of text usually accompanied by hash signs at the beginning. While these may appear just that, they lend a topical relevance to your notes.
A Tag isn’t so much helpful in the note-creation process as it is helpful in organizing notes that are already created. A system of tags helps to link notes that are of the same topic together and categorize them.
So far, the Notes app only facilitated adding notes in different folders. This makes searching for them difficult especially if you have accumulated a vast library.
However, with tags, you can add structure to your notes by clearly defining them and making them easily searchable later on.
Let’s consider you have a vast collection of brownie recipes. However, at the moment, you are only interested in a particular recipe involving both chocolate chips and walnuts. Instead of winnowing out individual notes to search for that specific type of brownie using keywords, you can employ tags.
Provided you had added the appropriate tags to your note, you can simply search by tags for recipes containing both walnuts and chocolate chips and receive results without further hassle.
Similarly, imagine how helpful tags would be for someone with thousands of essential notes, perhaps a student or a researcher.
How to add tags in macOS Monterey and iOS 15
The Notes app now uses tags, which makes it a powerful alternative to many third-party note-taking apps, considering it comes pre-installed on your iPhone, iPad, and Mac.
Now that the functionality is finally here, using it is just as easy as any other note-taking app, if not more so.

Apple has implemented a natural system for adding tags to your notes. This means that in order to tag a note, all you need to do is type in a hashtag followed by the tag label. You can do this naturally while typing and place them wherever you want in the text, making it less intimidating and time-consuming.
A hashtag within text in a note in the Notes app can be easily identified since it turns yellow as soon as you add it. The note is then automatically categorized according to the tag and is instantly searchable.
It’s also worth noting that the process of creating a note and typing a tag is the same for both macOS Monterey and iOS 15.
How to find notes using tags in the Notes app on macOS Monterey and iOS 15
The purpose of the existence of tags is to help you find notes you need faster and efficiently. Thankfully, it’s quite easy to navigate tags in the Notes app.
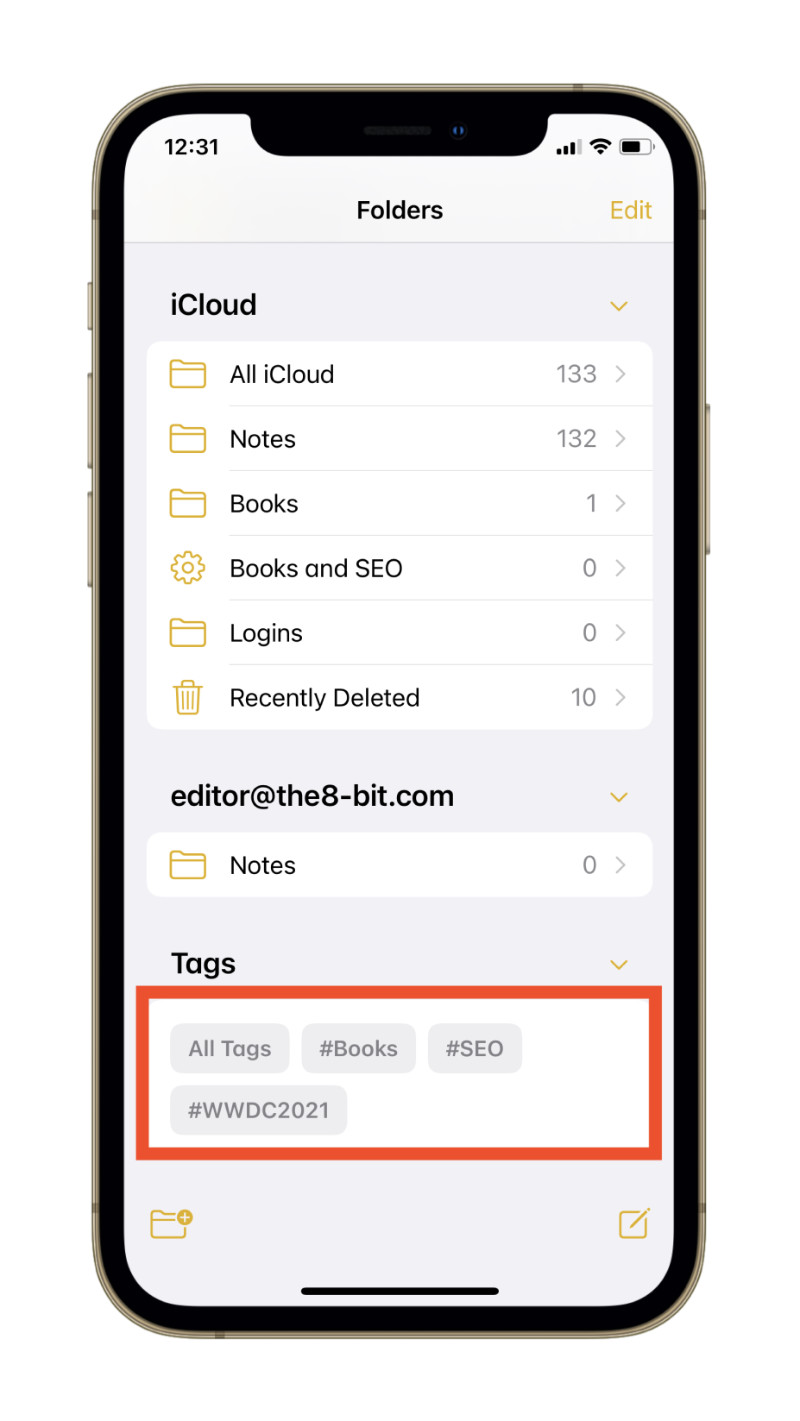
Tags in the Notes app are collectively accessible in the Tag browser in the sidebar on macOS Monterey and in the navigations page on iOS 15.

To look for notes with a specific tag, on macOS, simply click the tag. If you want to look for notes with multiple tags, click multiple tags so that they are highlighted together. Tap a tag again to remove the highlight and display notes with all tags.

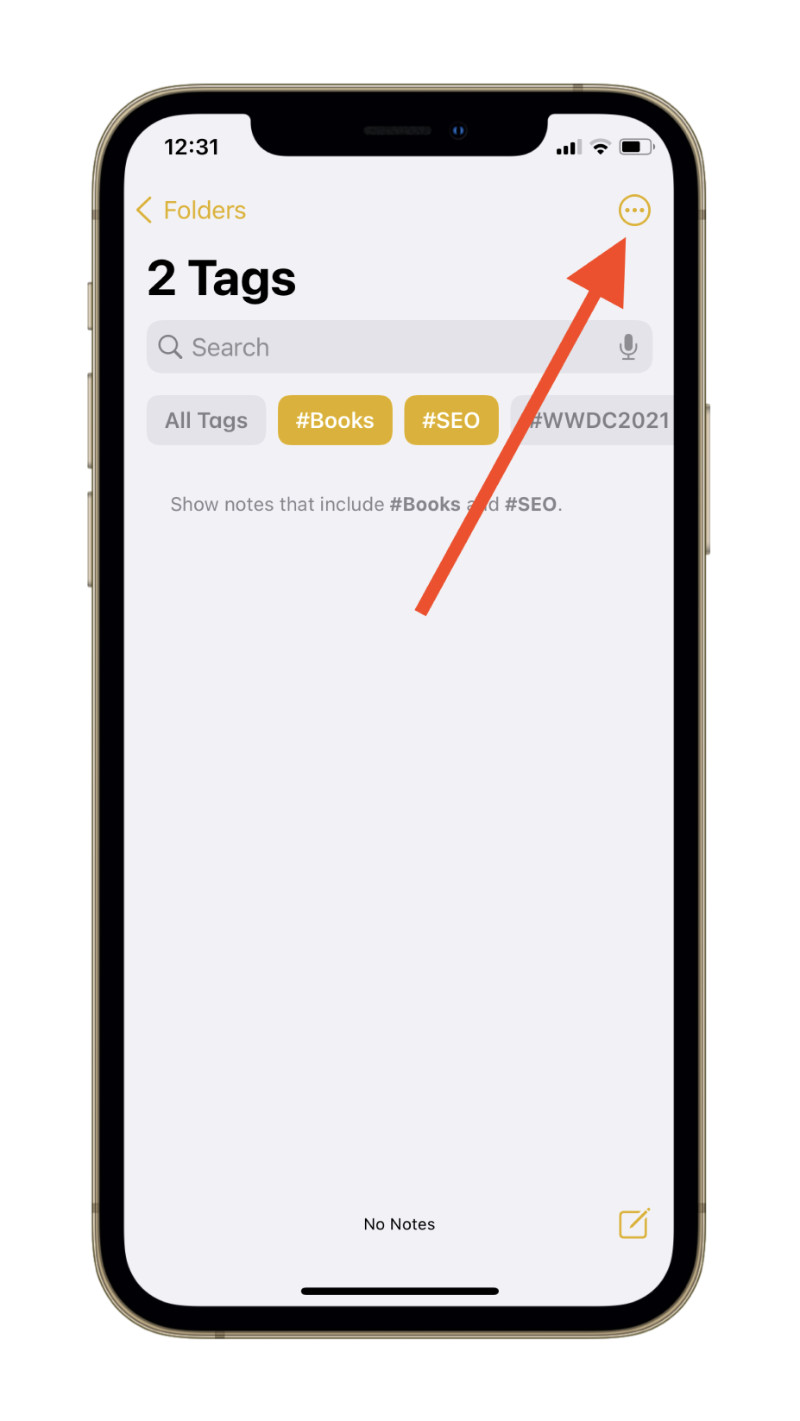
On iOS, tap a tag to display notes containing it. In order to look for notes with multiple tags, tap multiple tags together using the tag slider at the top of the page until they’re highlighted. Tap them again to remove the highlight and return to the list of notes with all the tags.
How to delete tags in the Notes app on macOS Monterey and iOS 15
Tags in the Notes app can only be deleted if you individually remove them from your notes until none are left. Alternately, you can also delete all the notes containing a particular tag.
Unfortunately, you cannot delete a tag altogether and expect it to be removed from all the subsequent notes.
How to create a Smart Folder using tags
Tags in the Notes app let you create what are called as Smart Folders.
These are folders that automatically fetch notes containing multiple tags, thereby differentiating them from regular folders.
Normally, you’d either need to create a note within the folder you want to ultimately place it in or move it there. However, with Smart Folders, notes are automatically added even though they were created in a different folder (but contain the tag associated with the Smart Folder).
How to create Smart Folders in the Notes app in macOS Monterey
- In the Notes app, select one or multiple tags in the Tag browser located in the sidebar by clicking on them.
- Then, right-click on one of the selected tags.
- Click Create Smart Folder.

- Name the Smart Folder

How to create Smart Folders in the Notes app in iOS 15
- In the Notes app, select one or multiple tags in the Tag browser.

- Then, tap the menu button with three dots (…) in the top right corner of the screen.

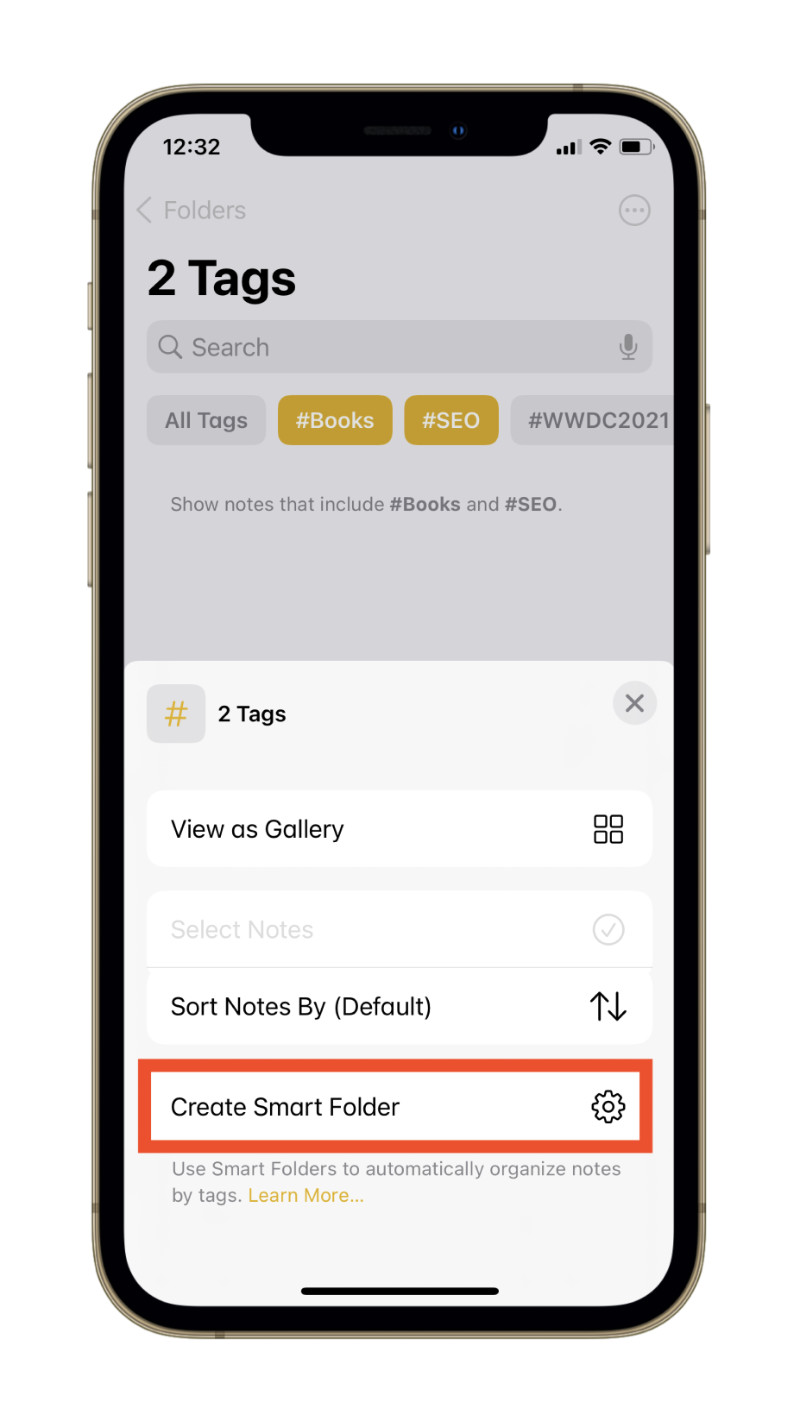
- From the options that pop up, tap Create Smart Folder.

- Name the Smart Folder and tap Save.

Final Thoughts
Note-taking is finally getting serious with the introduction of tags in the pre-installed Notes app on iOS 15 and macOS Monterey. The Notes app still has a far way to go when it comes to catching up with third-party note-taking apps, but it’s consoling to know that Apple is taking steps in the right direction.
Other macOS Monterey Guides you should check out:
- 100+ Fascinating Mac tips and tricks you need to check out!
- How to permanently show Menu Bar in full-screen mode on Mac
- How to share saved passwords on Mac running macOS 12 Monterey
- How to customize the mouse pointer in macOS 12 Monterey
- How to use Tab Groups in Safari in macOS 12 Monterey
- How to use Quick Note in macOS 12 Monterey
- How to AirPlay to Mac from an iPhone/iPad, mirror screen, and stream content
- How to mute notifications temporarily on macOS Monterey and iOS 15
- How to hide your IP Address in Safari on macOS Monterey and iOS 15
- How to enable and customize Focus filters on macOS Monterey
- How to turn on Auto-reply for Focus on macOS Monterey and iOS 15
- How to turn off ‘Shared With You’ in macOS Monterey and iOS 15
- How to use Live Text on Mac running macOS Monterey
- How to use Hide My Email to combat spam and secure your email on Mac
- How to use Private Relay on macOS Monterey
- How to add VoiceOver Image Descriptions in the Preview app in macOS Monterey
- How to Enable Low Power Mode on your Mac and How it Works!
- How to enable Mail Privacy Protection on macOS Monterey and iOS 15
- How to translate any text on your Mac running macOS Monterey
- How to change Playback Speed of Voice Memos in macOS Monterey
- How to add animated Memoji on your Mac’s login screen
- How to create Smart Lists in Reminders on macOS Monterey
- How to disable Universal Control on macOS Monterey
- How to ‘Skip Silence’ in Voice Memos on macOS Monterey
- 50+ Coolest Siri Shortcuts for your Mac running macOS Monterey

