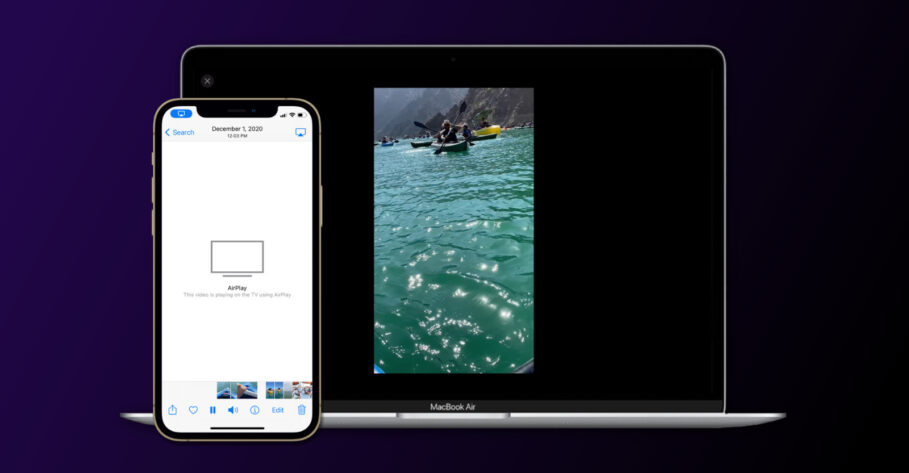
You could always cast your iPhone or iPad’s screen to an Apple TV to stream photos, videos, and music using AirPlay. What’s new? Using AirPlay, now you can also share content to your Mac from these devices.
Prior to a couple of weeks, AirPlay on Mac worked only as a transmitter of content. You could instantly stream photos and videos, mirror your Mac’s screen over to an Apple TV and use an iPad as a second display for your Mac.
However, with the introduction of macOS Monterey—Mac’s latest operating system—Apple updated AirPlay to also work as a receiver. This means you can now confidently stream content and screens from your other Apple devices to your Mac.
Let’s take a look at how to stream photos, videos, presentations, and documents from your iPhone or iPad to your Mac. We’ll also learn how to mirror an iPhone or iPad’s screen to your Mac.
- What is AirPlay 2 and how does it work?
- How to AirPlay content from iPhone or iPad to Mac on macOS 12 Monterey
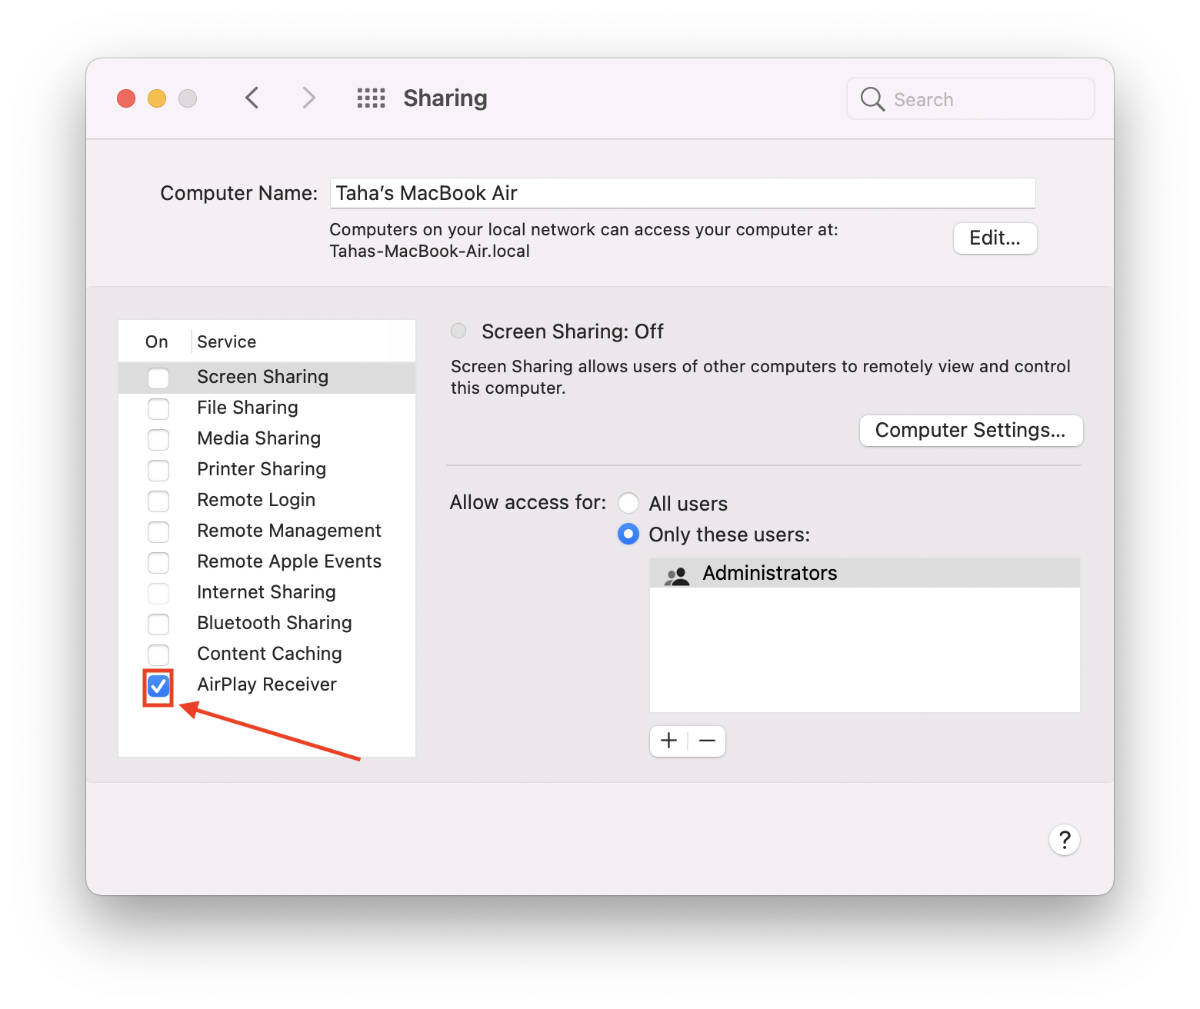
- How to set up your Mac to receive AirPlay content
- How to stream a photo or video to your Mac from your iPhone or iPad using AirPlay 2
- How to stream a movie or TV Show from the Apple TV app on iPhone or iPad to Mac using AirPlay 2
- How to stream music from the Music app on iPhone or iPad to Mac using AirPlay 2
- How to stream YouTube videos on iPhone or iPad to Mac using AirPlay 2
- How to mirror your iPhones or iPad’s screen to Mac using AirPlay 2
- Final Thoughts
- Other macOS Monterey Guides you should check out:
Before we begin, though…
What is AirPlay 2 and how does it work?
In simple terms, AirPlay is Apple’s wireless communication protocol using which users can stream content stored locally from one device to another. It’s a proprietary system developed by the Cupertino tech giant itself.
However, Apple does license it to third-party manufacturers so that they can implement the protocol into their devices. As such, a multitude of third-party devices including smart TVs and speakers now support AirPlay.
AirPlay was originally called AirTunes when it launched alongside iOS 4.2 back over a decade ago. Eventually, it was renamed AirPlay and now, its latest version is numbered AirPlay 2, similar to the nomenclature of other Apple products.
The original version of AirPlay was already revered. However, AirPlay 2 brought along notable improvements including streaming audio to stereo speakers, audio streaming to multiple devices, the ability to manage AirPlay from the Control Center, the Home app, as well as via Siri; and buffering.
AirPlay works over Wi-Fi and both the transmitter and recipient device must be connected to the same network. It also works over a USB connection which, in turn, has a major advantage—reduced latency.
As for its capabilities, it lets you do three things:
- Watch videos, photos, and presentations.
- Listen to music.
- Share (mirror) your iPhone, iPad, or Mac’s screen.
Here’s everything you can stream using AirPlay:
- Movies
- TV Shows
- Photos
- Videos (Even from the YouTube app)
- An Apple device’s screen.
- Music
AirPlay competes with other similar protocols such as Google Cast and Miracast. However, it’s confined to Apple’s ecosystem with a few third-party manufacturers supporting it.
How to AirPlay content from iPhone or iPad to Mac on macOS 12 Monterey
Now that you have an initial idea of what AirPlay is, what it can do, and how it works, let’s take a look at how to leverage the wireless protocol’s new ability to work as a recipient on a Mac; which wasn’t previously possible.
Apple says, “your Mac works with any Apple device, and it’s even easier to connect if the devices share the same Apple ID.”
How to set up your Mac to receive AirPlay content
- Head over to macOS System Preferences by clicking the Apple logo situated on the Menu Bar.

- Click on Sharing.

- Under the service section, tick the AirPlay Receiver option. (A blue tick should appear)
How to stream a photo or video to your Mac from your iPhone or iPad using AirPlay 2
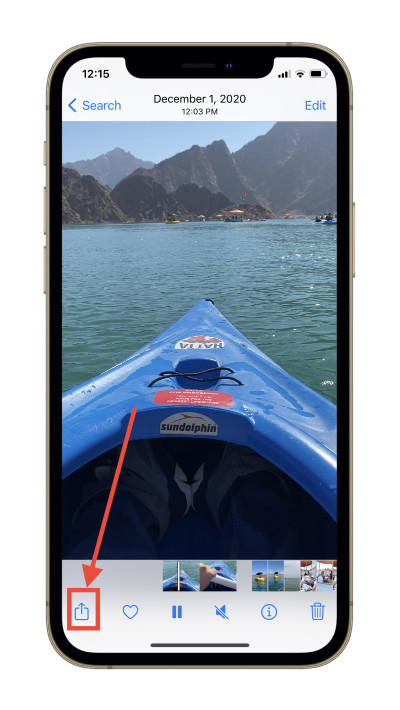
You can stream a photo or video to your Mac from your iPhone or iPad using the Photos app on these devices. It’s quite useful at a time when you need the prowess of a bigger display to show off photos of your recent kayaking adventure.
- On your iPhone, head over to the Photos app and choose a photo or video that you want to display on your Mac’s screen.
- Tap the Share Sheet icon. (Looks like a vertical arrow jutting out of a square)
- Scroll down a bit and tap AirPlay.
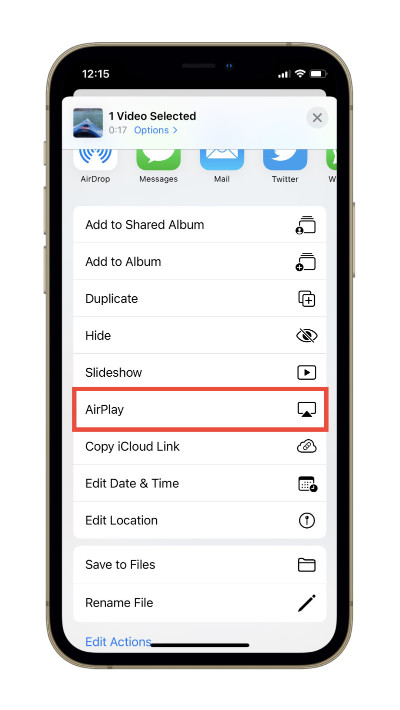
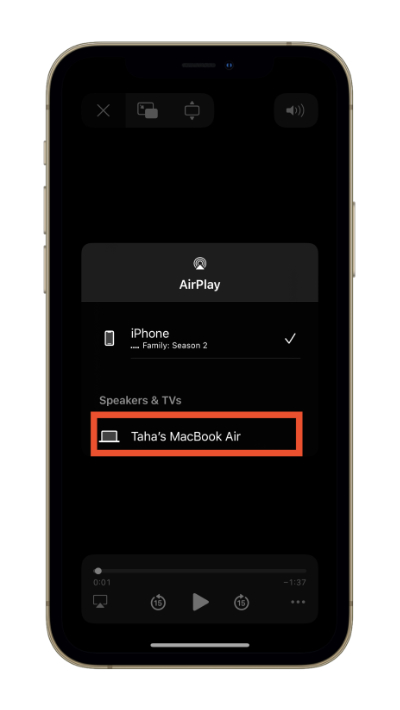
- Then choose the MacBook that you want to display the content to from the list of available AirPlay devices.

How to stream a movie or TV Show from the Apple TV app on iPhone or iPad to Mac using AirPlay 2
- Head over to the Apple TV app on your iPhone or iPad and choose a movie or TV show of your choice.
- Play the content.

- Tap the AirPlay icon located beside video controls. (It signifies a triangle pointing towards a rectangle)
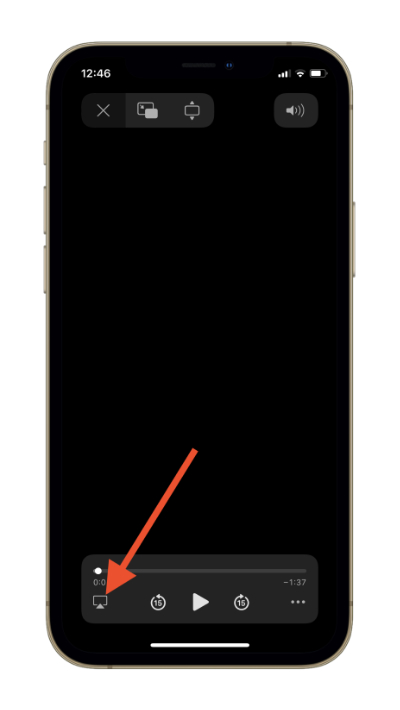
- Then choose the MacBook that you want to stream the content to from the list of available AirPlay devices.
How to stream music from the Music app on iPhone or iPad to Mac using AirPlay 2
- Head over to the Music app on iPhone or iPad and begin playing a track of your choice.
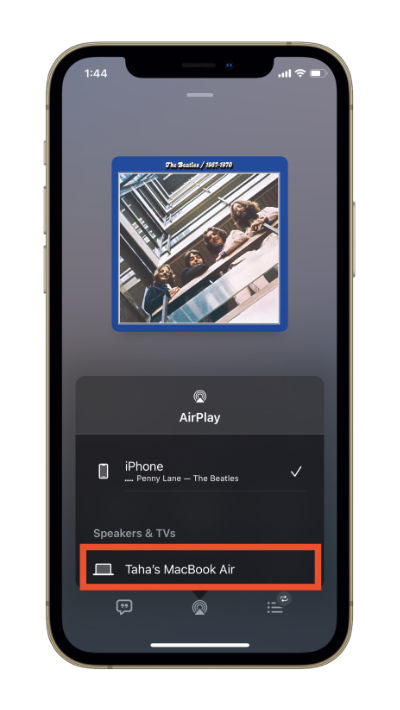
- Tap the AirPlay icon located right beneath the volume slider in the Music app.

- Then choose the MacBook that you want to stream the content to from the list of available AirPlay devices.
How to stream YouTube videos on iPhone or iPad to Mac using AirPlay 2
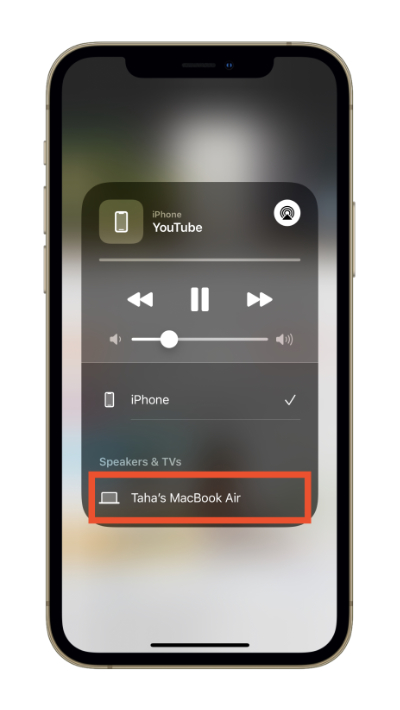
Despite the fact that multiple media exist letting you watch YouTube videos on your Mac, should need to AirPlay a YouTube video from your iPhone to your Mac arise, you can now do so. Here’s how.
- Head over to the YouTube app on your iPhone or iPad and play a video.
- While the video is still playing, (on iPhones with Face ID) swipe down from the top right corner of the screen, and (on iPhones with Touch ID) swipe up from the bottom of the screen to access Control Center. On iPad, swipe down from the top right corner of the screen irrespective of the orientation.
- There, tap the AirPlay icon located on the media palate.
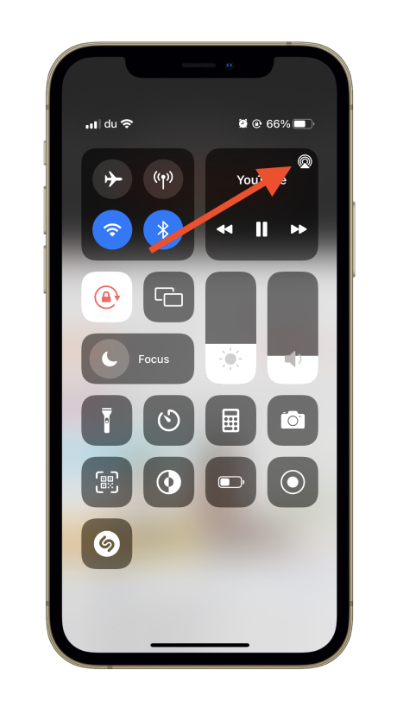
- Finally, choose the MacBook that you want to stream the content to from the list of available AirPlay devices.
How to mirror your iPhones or iPad’s screen to Mac using AirPlay 2
AirPlay Mirroring is a splendid functionality the feature incorporates. It lets you simply mirror your iPhone or iPad’s screen onto your Mac’s display. This is useful at times when you need to demo an app or showcase a functionality.
A particular aspect of screen mirroring via AirPlay that is worth noting is that while mirroring your device’s screen when you play videos or watch photos, they appear as if they are being streamed regularly via AirPlay and do not behave like an iPhone or iPad’s screen.
For instance, tilting a photo on an iPhone within the Photos app won’t tilt it on your Mac while mirroring your device’s screen.
That said, here’s how to mirror an iPhone or iPad’s screen to your Mac via AirPlay on macOS 12 Monterey:
- (on iPhones with Face ID) Swipe down from the top right corner of the screen, and (on iPhones with Touch ID) swipe up from the bottom of the screen to access Control Center. On iPad, swipe down from the top right corner of the screen irrespective of the orientation.
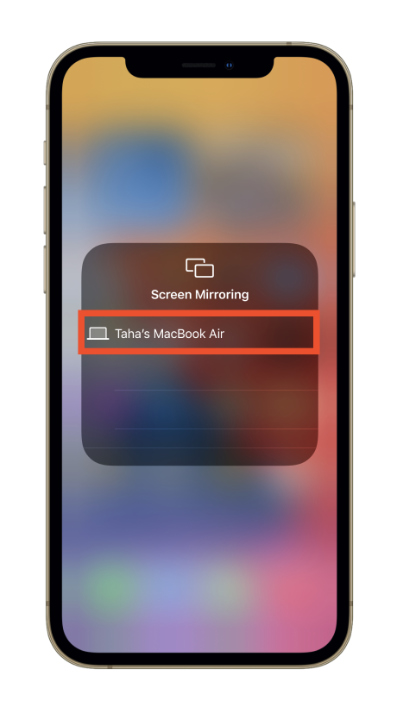
- Tap the screen mirroring option. (Icon signifies two rectangles stacked together distinctly)
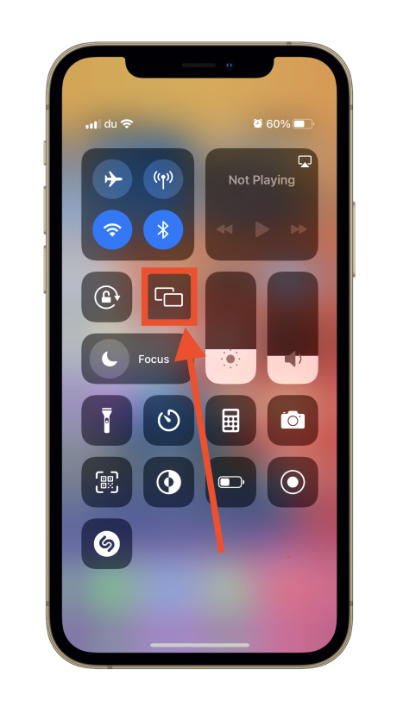
- Finally, choose the MacBook that you want to stream the content to from the list of available AirPlay devices.
Final Thoughts
Now that you can use AirPlay to showcase your photos, videos, movies, TV shows, and even YouTube videos on the bigger screen of your Mac on macOS Monterey, only time can tell how valuable of an addition it is.
In order to stop an AirPlay stream, simply tap the AirPlay button again in whatever app you are streaming from or in the Control Center and tap on iPhone or iPad again, depending on which device you’re streaming from.
Currently, macOS 12 Monterey is only available in beta capacity. There’s a chance Apple refines and improves this feature before it finally ships alongside the official version by the end of the year.
Other macOS Monterey Guides you should check out:
- 100+ Fascinating Mac tips and tricks you need to check out!
- How to permanently show Menu Bar in full-screen mode on Mac
- How to share saved passwords on Mac running macOS 12 Monterey
- How to customize the mouse pointer in macOS 12 Monterey
- How to use Tab Groups in Safari in macOS 12 Monterey
- How to use Quick Note in macOS 12 Monterey
- How to mute notifications temporarily on macOS Monterey and iOS 15
- How to hide your IP Address in Safari on macOS Monterey and iOS 15
- How to enable and customize Focus filters on macOS Monterey
- How to turn on Auto-reply for Focus on macOS Monterey and iOS 15
- How to turn off ‘Shared With You’ in macOS Monterey and iOS 15
- How to add and manage Tags in Notes in macOS Monterey and iOS 15
- How to use Live Text on Mac running macOS Monterey
- How to use Hide My Email to combat spam and secure your email on Mac
- How to use Private Relay on macOS Monterey
- How to add VoiceOver Image Descriptions in the Preview app in macOS Monterey
- How to Enable Low Power Mode on your Mac and How it Works!
- How to enable Mail Privacy Protection on macOS Monterey and iOS 15
- How to translate any text on your Mac running macOS Monterey
- How to change Playback Speed of Voice Memos in macOS Monterey
- How to add animated Memoji on your Mac’s login screen
- How to create Smart Lists in Reminders on macOS Monterey
- How to disable Universal Control on macOS Monterey
- How to ‘Skip Silence’ in Voice Memos on macOS Monterey
- 50+ Coolest Siri Shortcuts for your Mac running macOS Monterey
