The Preview app in macOS Monterey now facilitates adding image descriptions. For some people, it might be difficult to find the option to add these. That’s where this post comes in.
Accessibility is a human right. Everyone, regardless of disabilities, is entitled to use technology as everyone else. Apple’s accessibility-aiding tools in its devices including the Mac, iPhone, and iPad have proven to be quite useful over time. The company, like most major companies at the forefront of technology, seems to care about accessibility.
Furthering that notion is the Image Descriptions feature in the Preview app on macOS Monterey. It lets you describe images downloaded to your Mac and accessible through Desktop or the macOS Finder.
Why adding image descriptions helps
Image descriptions have been the obscure lifeblood of software for a long time. Google’s search engine, for one, requires websites like ours to add “alt tags”—otherwise known as image descriptions—to images. This ensures that visually disabled people can use text-to-speech programs to understand the contents of the image.
It’s so important that Google prefers websites that have descriptions accompanying images over websites that don’t, which is ultimately reflected in Google’s search engine rankings.
Adding image descriptions in the Preview app on your Mac, on the other hand, helps disabled users use voiceover to learn about the contents of the image right from the Finder.
How to add VoiceOver image descriptions in the Preview app in macOS Monterey
Adding a description to an image sitting in your local or cloud storage and accessible through the Preview app on your Mac running macOS Monterey is quite easy.
However, there’s a chance you might miss the option to do so due to the natural lack of labels in the Preview app toolbar.
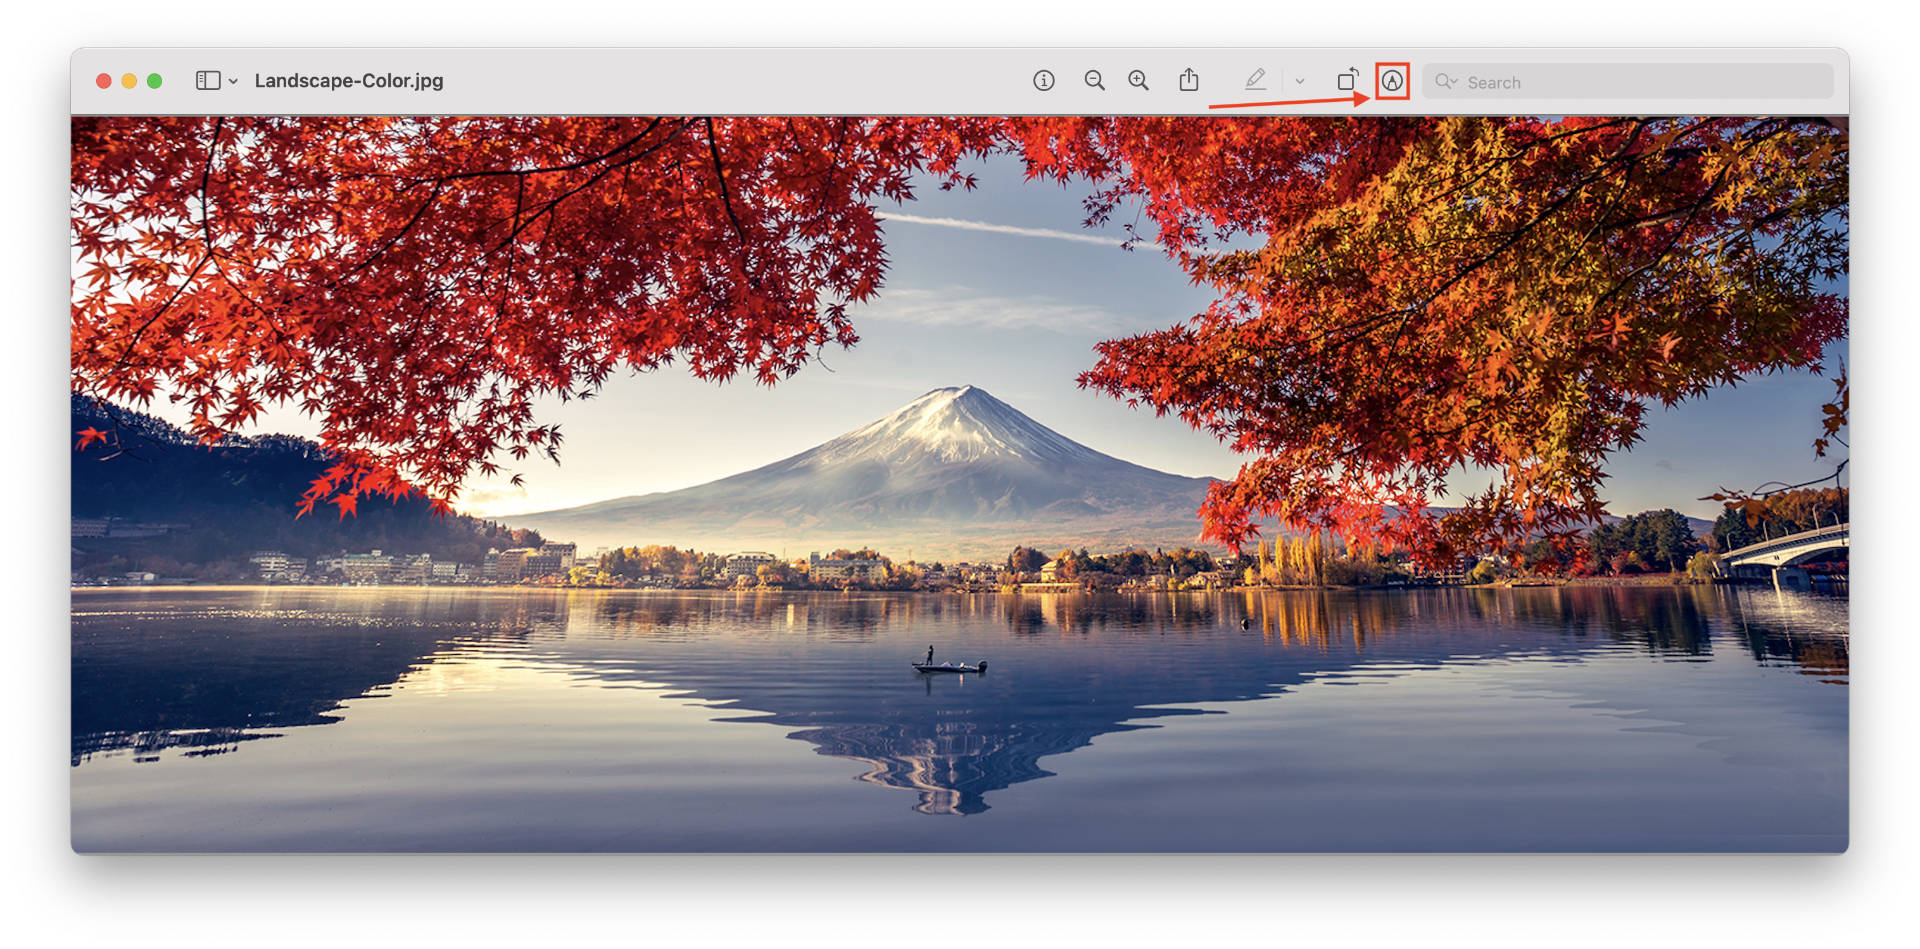
- Open an image using the Preview app. It should be the default option while opening an image unless you had changed it.
- Click on the Markup option as highlighted in the image below.

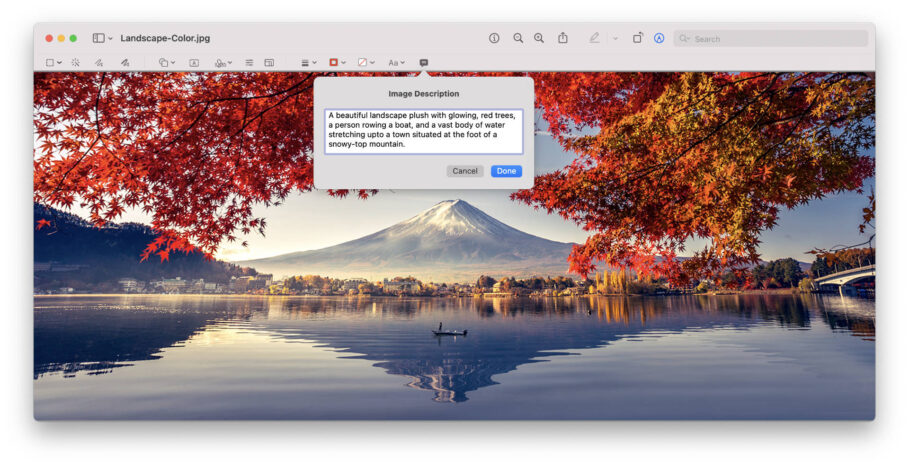
- Click on the icon depicting double inverted quotes enclosed in a speech balloon.

- Type in the description for your image and click “Done.”

Other macOS Monterey Guides you should check out:
- 100+ Fascinating Mac tips and tricks you need to check out!
- How to permanently show Menu Bar in full-screen mode on Mac
- How to share saved passwords on Mac running macOS 12 Monterey
- How to customize the mouse pointer in macOS 12 Monterey
- How to use Tab Groups in Safari in macOS 12 Monterey
- How to use Quick Note in macOS 12 Monterey
- How to AirPlay to Mac from an iPhone/iPad, mirror screen, and stream content
- How to mute notifications temporarily on macOS Monterey and iOS 15
- How to hide your IP Address in Safari on macOS Monterey and iOS 15
- How to enable and customize Focus filters on macOS Monterey
- How to turn on Auto-reply for Focus on macOS Monterey and iOS 15
- How to turn off ‘Shared With You’ in macOS Monterey and iOS 15
- How to add and manage Tags in Notes in macOS Monterey and iOS 15
- How to use Live Text on Mac running macOS Monterey
- How to use Hide My Email to combat spam and secure your email on Mac
- How to use Private Relay on macOS Monterey
- How to Enable Low Power Mode on your Mac and How it Works!
- How to enable Mail Privacy Protection on macOS Monterey and iOS 15
- How to translate any text on your Mac running macOS Monterey
- How to change Playback Speed of Voice Memos in macOS Monterey
- How to add animated Memoji on your Mac’s login screen
- How to create Smart Lists in Reminders on macOS Monterey
- How to disable Universal Control on macOS Monterey
- How to ‘Skip Silence’ in Voice Memos on macOS Monterey
- 50+ Coolest Siri Shortcuts for your Mac running macOS Monterey

