Apple is intensifying features within apps like Reminders and Notes with the help of new filters and tools in macOS Monterey and iOS 15. Both apps are now considerably more powerful than their predecessors.
The Notes app, for instance, has gained tags and Smart Folders. The Reminders app has gained tags, too, alongside a new form of organization called Smart Lists. In this post, we will learn in detail about Smart Lists in the Reminders app and also see how to create a new Smart List.
What is a Smart List?
The Reminders app has remained the default app for setting reminders and alerts on macOS and iOS for a long time. Despite being so easily accessible, people continue to prefer third-party apps to fulfill their purpose and support their daily usage.
I think that’s about to change with Smart Lists.
One of the tacit shortcomings of the Reminders app is its poor organizational capabilities. Sure, it does a decent job setting a reminder and reminding you about it. Its tight integration with other system apps like Messages, Maps, and the Calendar is even revered.
However, it gets overwhelming to use the app after a while when the reminders pile up and you cannot access them in the specific way that you’d like.

With Smart Lists, you can now have your reminders and list items automatically arranged into dedicated lists with the help of filters. You can filter reminders by tags, date, time, priority, location, and on the basis of its flagged status.
An interesting point to note regarding Smart Lists in Reminders is that you can add multiple filters at a time.
For example, you can create a Smart List that automatically pulls reminders containing the tag “Coffee” and a location for a particular cafe.
Smart Lists have two effects:
- It saves time by having your notes automatically organized and allows you to casually create new reminders.
- It lets you find and edit your reminders quicker than before.
What is the difference between Smart Lists and Smart Folders
If you have been searching around for how to create a new Smart List in Reminders, you might have come across a similar term that confused you.
Smart Folders, although a new addition as well, are different than Smart Lists.
Smart Folders are used in the Notes app and are only capable of collecting Notes with one or multiple tags. They do not feature other filters besides tags. On the other hand, Smart Lists are used in the Reminders app and can also collect lists with a certain date, time, priority, location, and flagged status alongside tags.
This way, Smart Lists are well-suited for the Reminders app while Smart Folders are well-suited for the Notes app.
If you want to learn more about using Smart Folders in the Notes app, you can head over to our guide explaining that with steps on how to create a new Smart Folder and manage it further.
How to create a new Smart List in macOS Monterey
- Head over to the Reminders app.
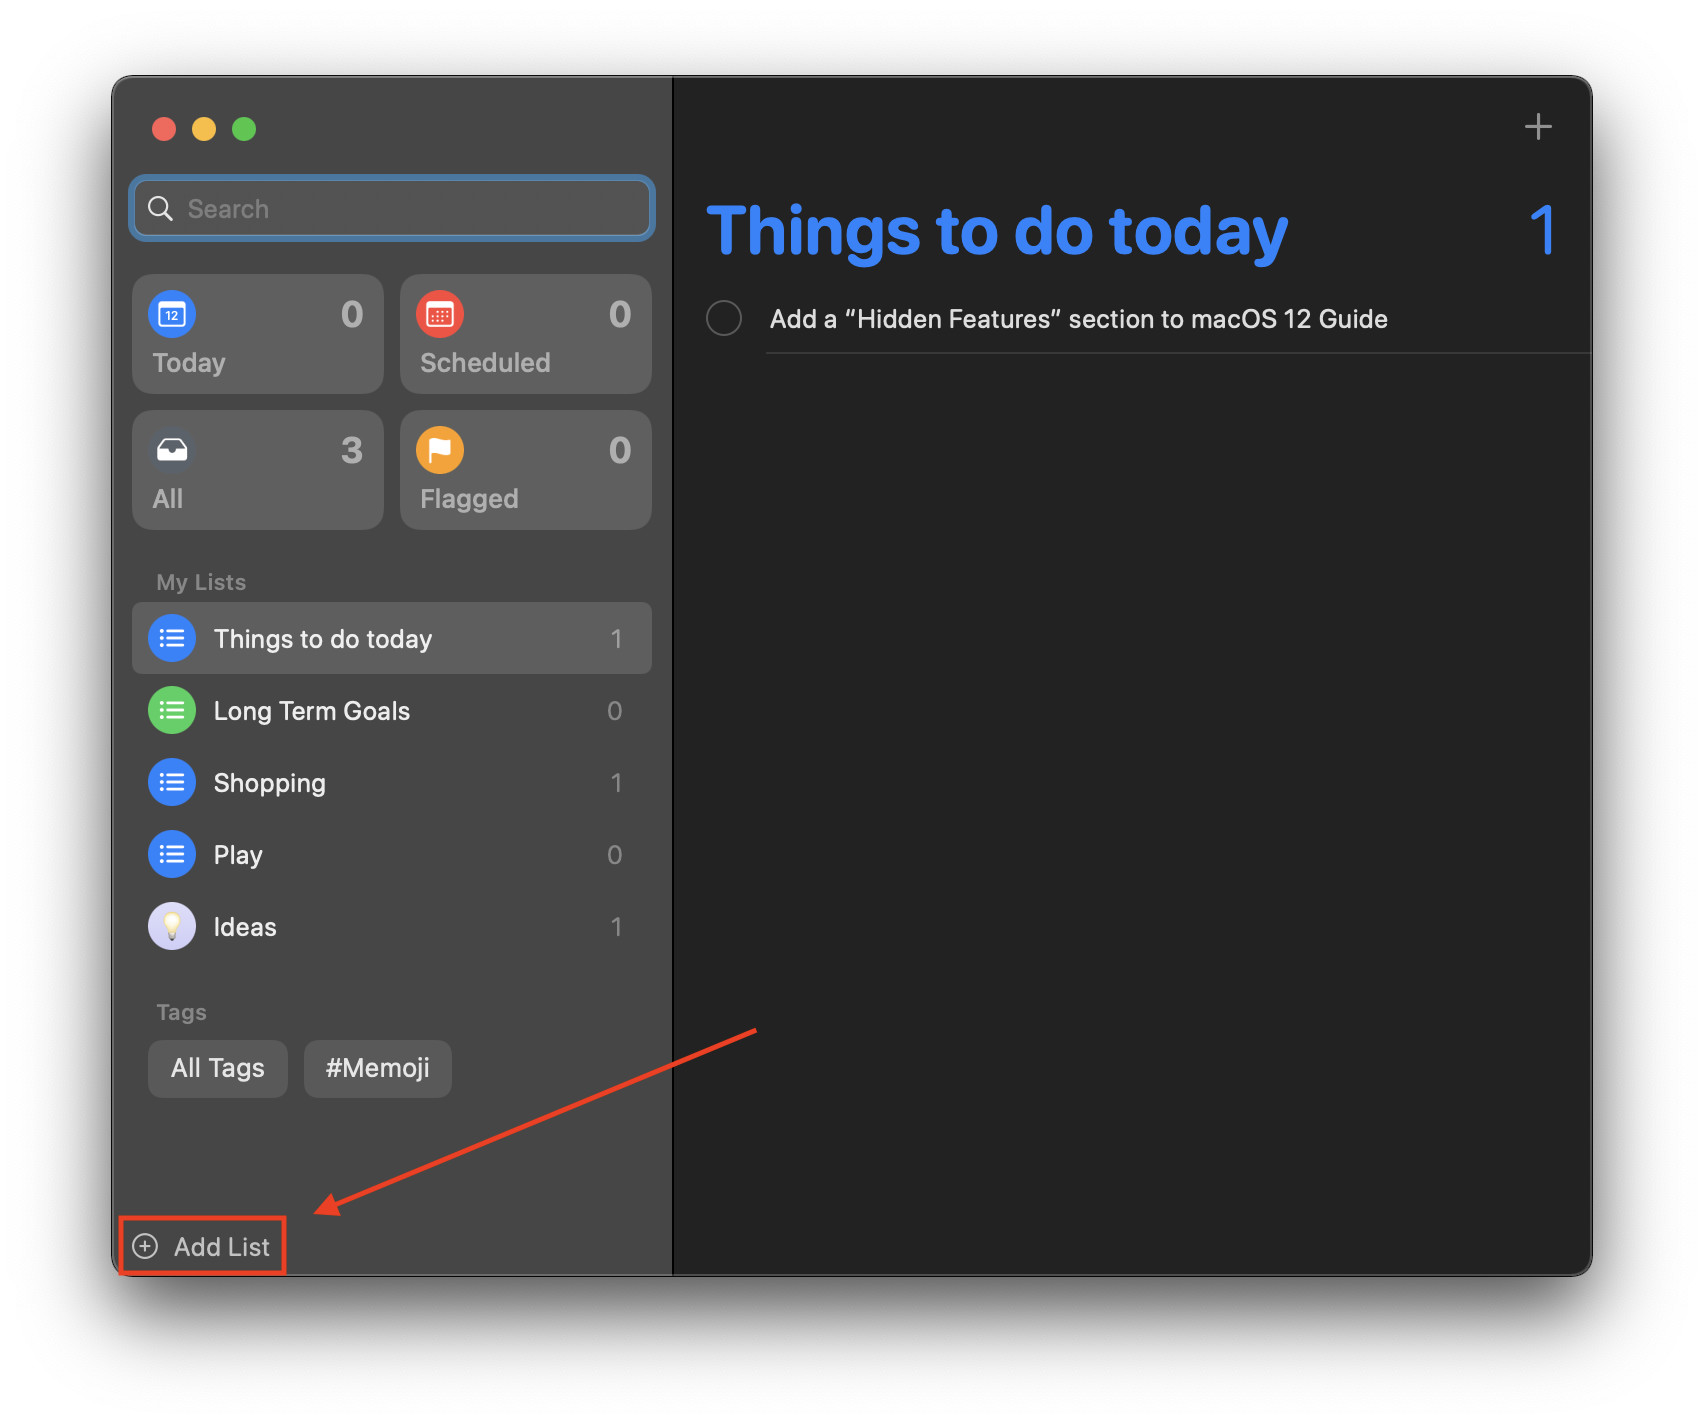
- Click the “Add List” button in the bottom-left corner of the screen.

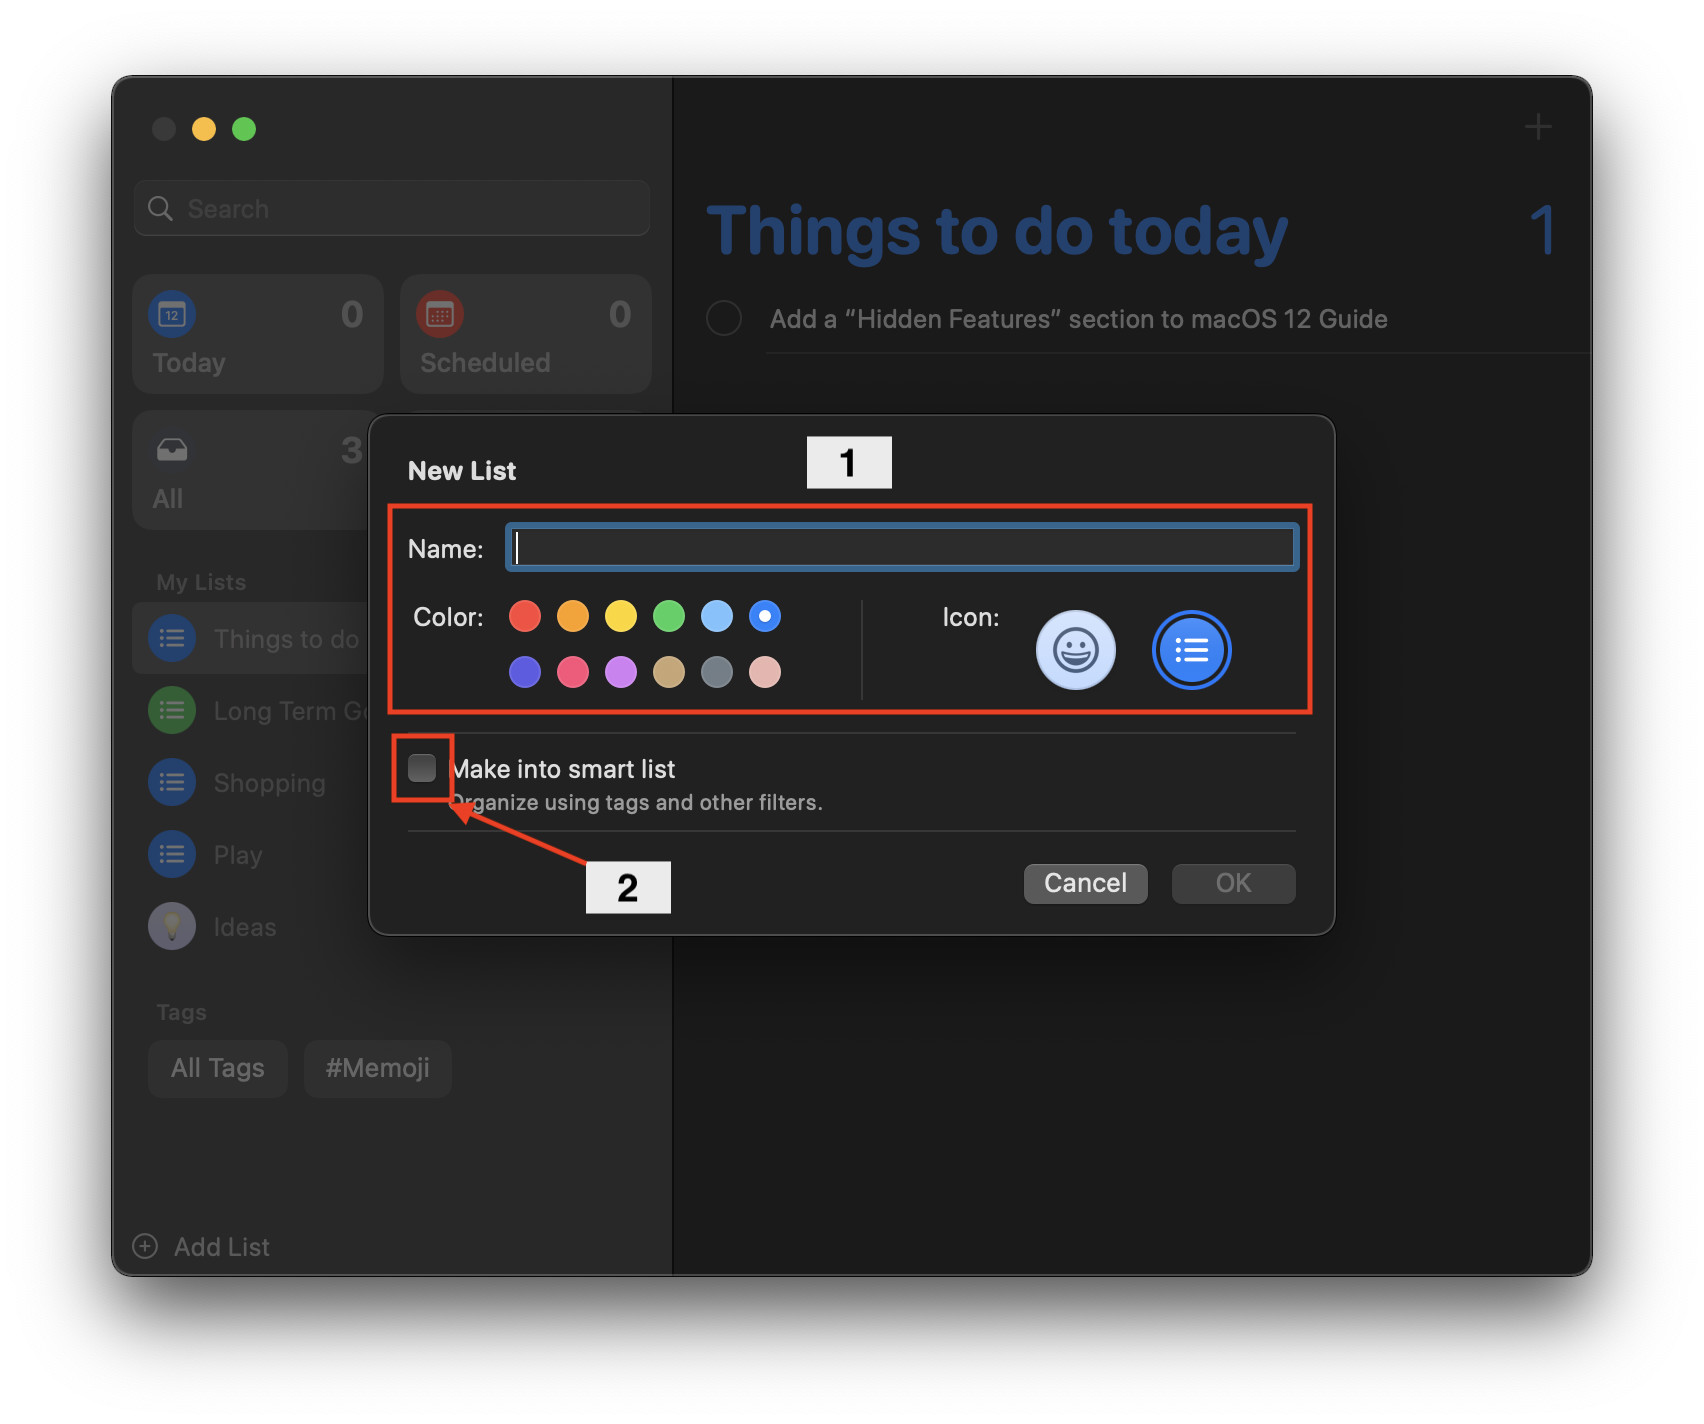
- Enter a name for the Smart List, assign it a color and an icon.
- Then, tick “Make into smart list.”

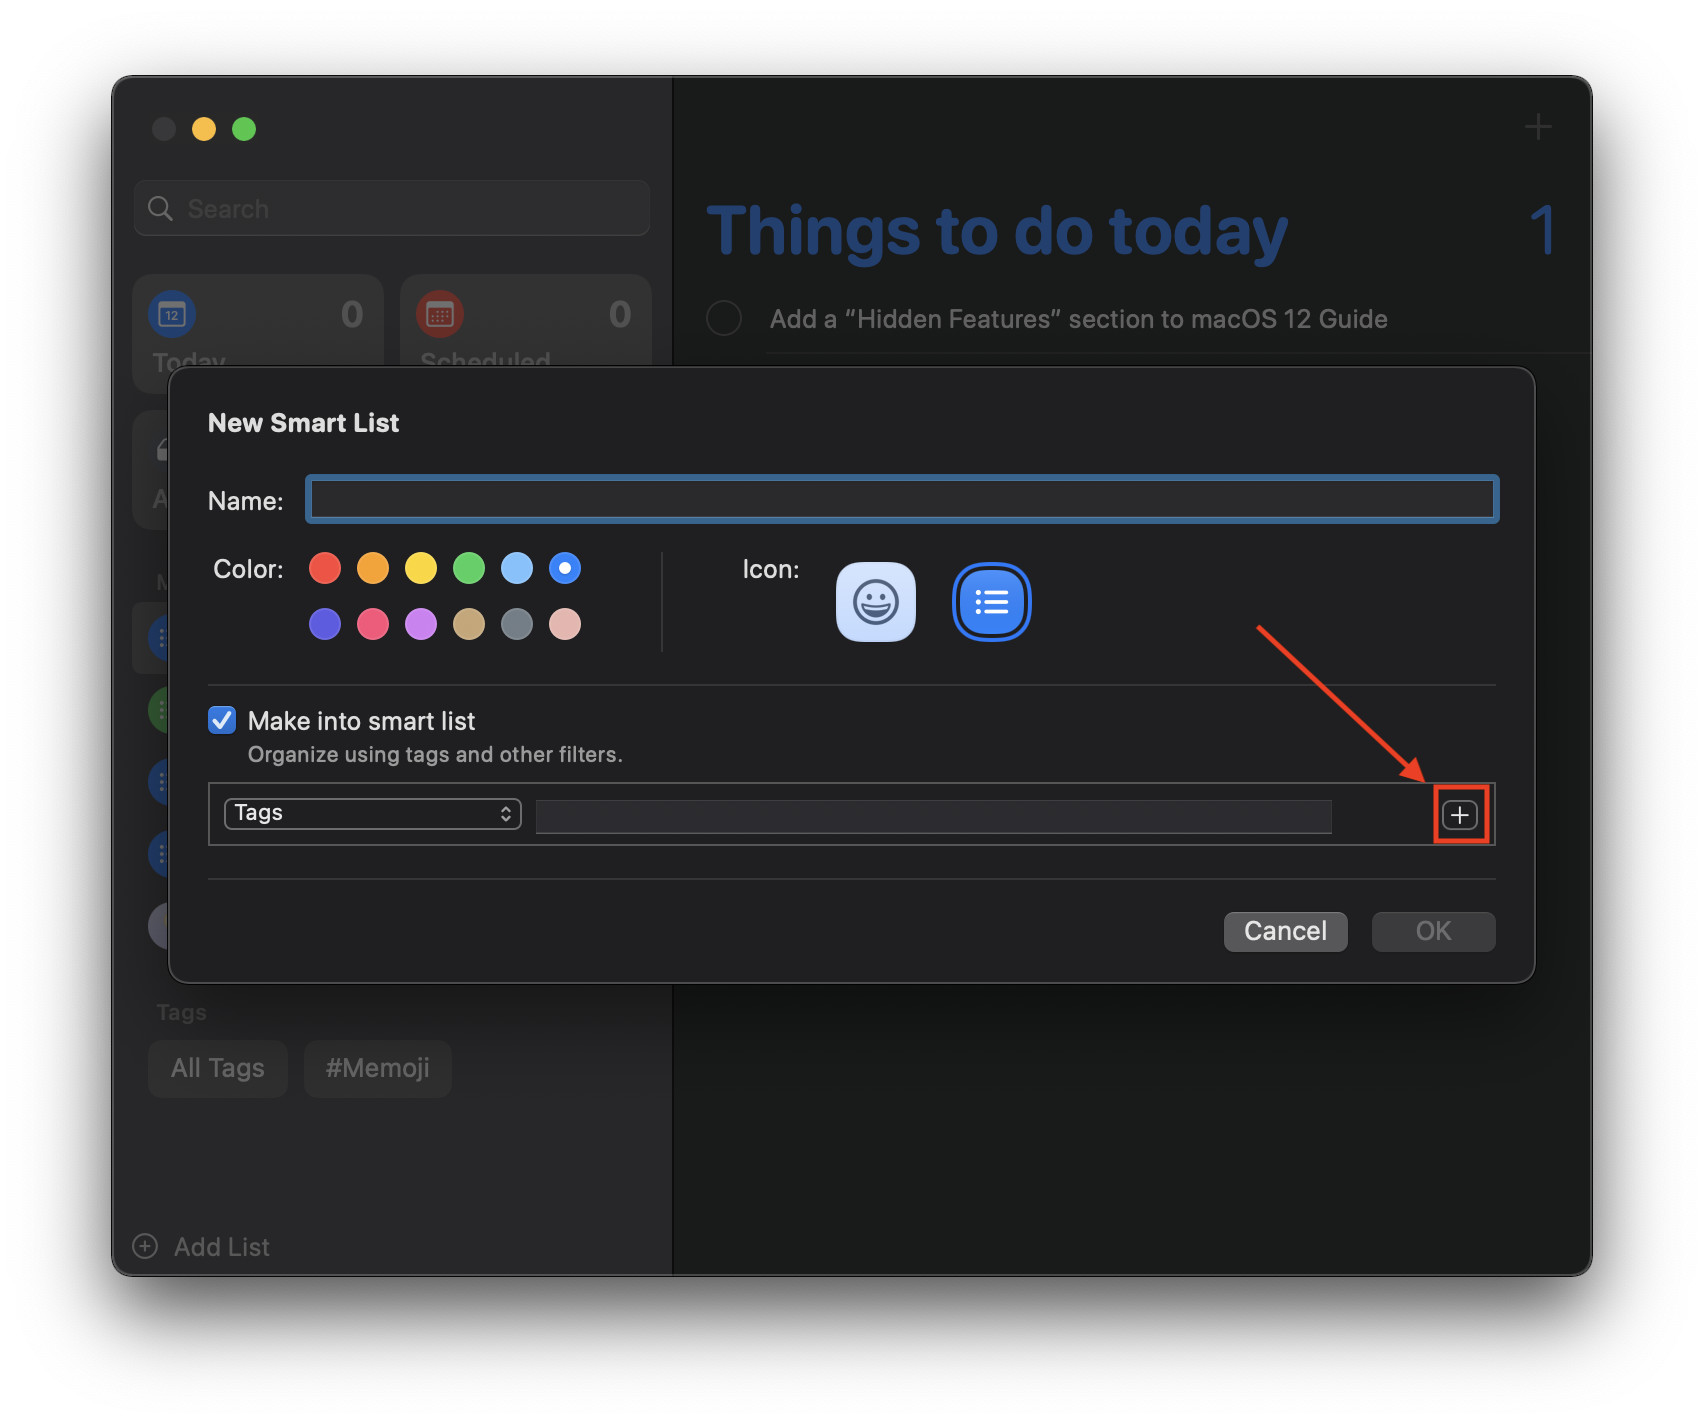
- Now, it’s time to add filters. The default filter is Tags. However, you can click on the dropdown menu to change the type of filter. Each filter has its own parameters. For instance, the date filter allows you to set a specified date range, any date, or a relative date range. Once you select a filter, its subsequent parameters will automatically appear for you to modify.

- You can also add multiple filters at once. To do that, simply click the plus (“+”) button in the right of the filter and repeat the steps above.

- Finally, click “OK” to save the Smart List.

Note that you cannot convert existing lists into smart lists or vice versa.
Final Thoughts
Smart Lists are a powerful and useful addition to the Reminders app that, in my opinion, will change people’s perception of the app. There are still a few shortcomings, inconveniences, and silly bugs here and there that bar it from ultimately making the grade, but Apple is getting there.
Hopefully, we can see the Reminders app get refined to a better state with future updates.
Other macOS Monterey Guides you should check out:
- 100+ Fascinating Mac tips and tricks you need to check out!
- How to permanently show Menu Bar in full-screen mode on Mac
- How to share saved passwords on Mac running macOS 12 Monterey
- How to customize the mouse pointer in macOS 12 Monterey
- How to use Tab Groups in Safari in macOS 12 Monterey
- How to use Quick Note in macOS 12 Monterey
- How to AirPlay to Mac from an iPhone/iPad, mirror screen, and stream content
- How to mute notifications temporarily on macOS Monterey and iOS 15
- How to hide your IP Address in Safari on macOS Monterey and iOS 15
- How to enable and customize Focus filters on macOS Monterey
- How to turn on Auto-reply for Focus on macOS Monterey and iOS 15
- How to turn off ‘Shared With You’ in macOS Monterey and iOS 15
- How to add and manage Tags in Notes in macOS Monterey and iOS 15
- How to use Live Text on Mac running macOS Monterey
- How to use Hide My Email to combat spam and secure your email on Mac
- How to use Private Relay on macOS Monterey
- How to add VoiceOver Image Descriptions in the Preview app in macOS Monterey
- How to Enable Low Power Mode on your Mac and How it Works!
- How to enable Mail Privacy Protection on macOS Monterey and iOS 15
- How to change playback speed of Voice Memos in macOS Monterey.
- How to translate any text on your Mac running macOS Monterey
- How to add animated Memoji on your Mac’s login screen
- How to disable Universal Control on macOS Monterey
- How to ‘Skip Silence’ in Voice Memos on macOS Monterey
- 50+ Coolest Siri Shortcuts for your Mac running macOS Monterey

